In this article we are covering new concept of teaming interfaces – used when you have Hyper-V role installed as it is only available in conjunction with Virtual Switch – that is called Switch embedded teaming (or SET) – so basically if you are using a physical server for some other roles you should still stick to “classical” NIC teaming (NetLbfo) that has been available since Windows server 2012.
Since SET is available I am using it – and I have also reconfigured some “old fashion design” configurations.
Quoting original documentation:
SET is an alternative NIC Teaming solution that you can use in environments that include Hyper-V and the Software Defined Networking (SDN) stack in Windows Server 2016/2019. SET integrates some NIC Teaming functionality into the Hyper-V Virtual Switch.
Virtual Switch that has Switch embedded teaming enabled by default uses Switch independent mode and Dynamic load distribution – you can change that in Powershell.
The next very important thing is that SET preserves RDMA functionality so you can use it in conjunction.
There is another great piece of documentation about “classic” team solution in Windows and Switch embedded teaming located here. I have copied the comparison table to have a quick look at features.
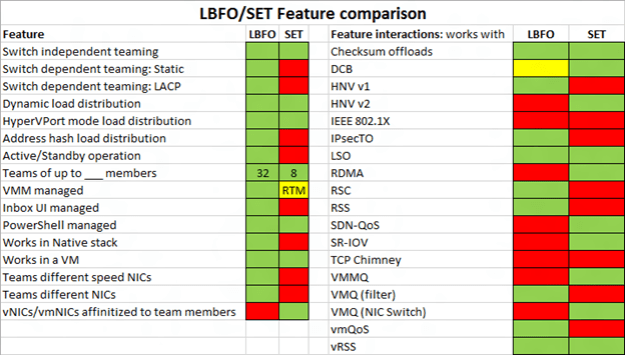
* from documentation: https://gallery.technet.microsoft.com/Windows-Server-2016-839cb607
So in the next video we are using New-VMSwitch cmdlet to create Virtual Switch with embedded teaming parameter:
New-VMSwitch -Name Team01 -EnableEmbeddedTeaming $true -AllowManagementOS $true -NetAdapterName NIC1,NIC2,NIC3,NIC4
Out of this adapter we are getting similar configuration as we did in part 3 – so only one virtual network card for our Hyper-V host.
And just to make sure … Let’s check default configuration made by cmdlet that we just fired of load balancing and teaming mode by using Get-VMSwitchTeam cmdlet:

As you can see we are getting also the same result as in part 3 – so only 1 gigabit throughput between Hyper-V server 1 and Hyper-V server 2.
