In this last post regarding security that you can apply by using Windows Defender Firewall with Advanced Security I would like to point out another option that is available when you start to configure more complex scenarios by using Connection security rules.
In this example I will force user (in this case Bill) that needs to connect from a specific workstation (PAW) (in this case C2) to use specific application (in this case Firefox) to access the web site on server (in our case SRV2). You will see that connection will not be established if Bill uses Edge (or some other browser).
This example can be an starting point to not only allow the connection to some servers services by using combination of correct user from correct workstation but also application that should be used for such connection.
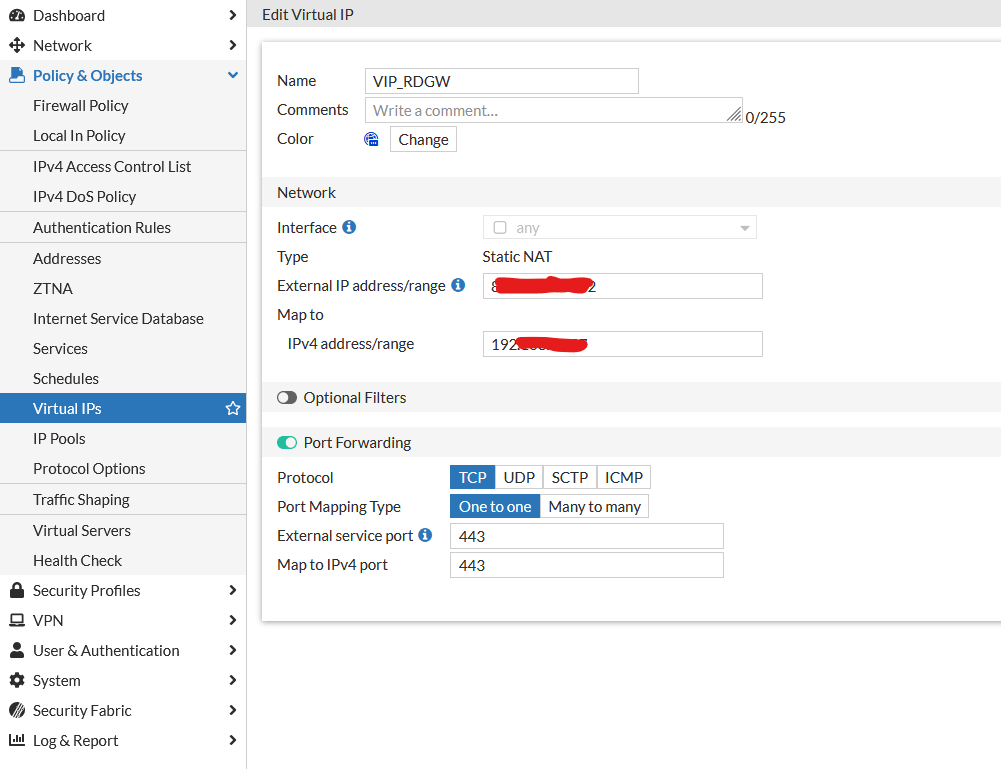
I just managed to publish Remote Desktop Gateway through Fortigate but not in a way of doing simple port forwarding but in reverse proxy concept so SSL is terminated on Fortigate and then forwarded to Remote Desktop Gateway. The cool thing is that Fortigate can now use Let’s Encrypt also with multiple subject names (also other domain names if you want (as seen in my example)) … I find it simply great that I can leverage certification renewal + extra firewall policies (like Geography) to Fortigate and let Windows Server to work only as Remote Desktop Gateway (on which I do not need to take care of certificates any more…).
I created a simple Virtual IP where I forwarded port 443 on public IP to 443 on internal IP:
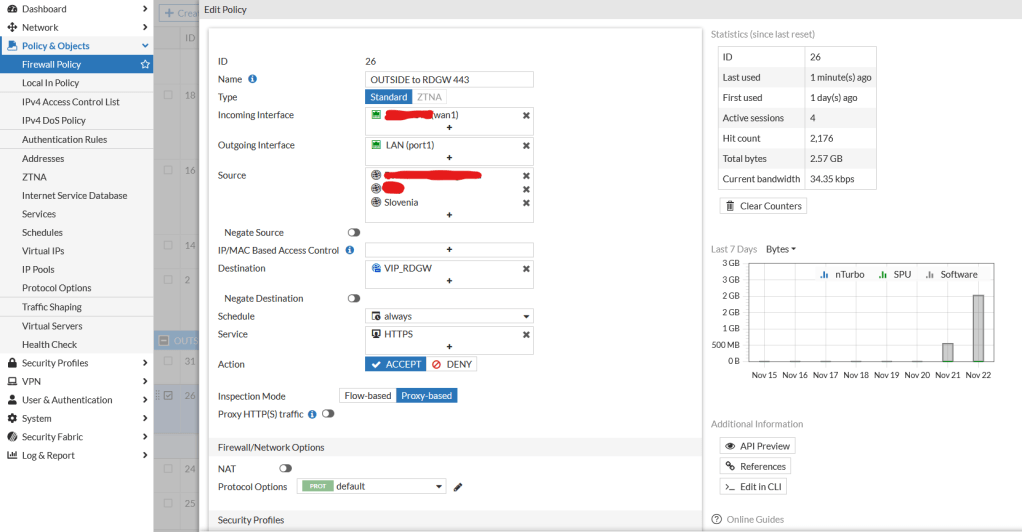
After that I created Firewall Policy rule:
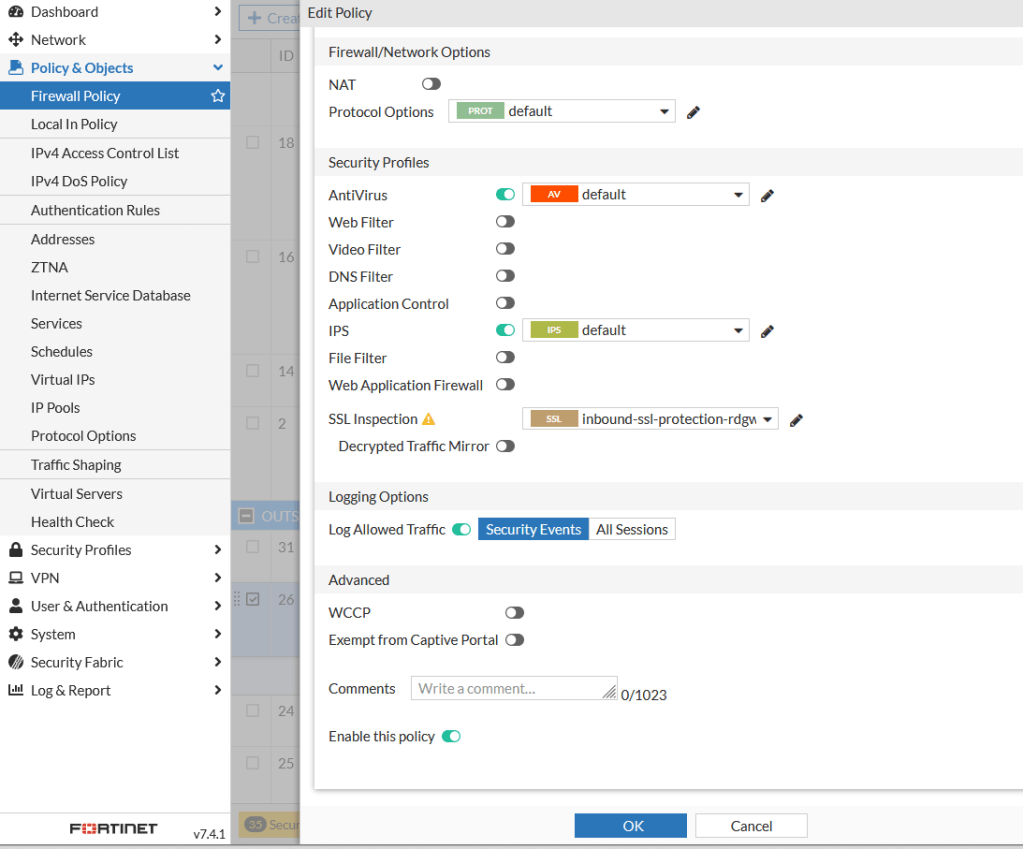
The important part comes here at SSL Inspection:
As you can see I am using two certificates (automatically generated with Let’s Encrypt using Fortigate) with not only multiple subject names on same domain but even different TLD.
There is a (small) trick – you need to enable RCP over HTTP on Fortigate for Remote Desktop Gateway functionality to work – and it is done in command line:
config firewall profile-protocol-options edit 0 set rpc-over-http enable end
After that you are ready to establish Remote Desktop Connection over Remote Desktop Gateway that is published via Fortigate with certificates that are automatically renewed by Fortigate.
That advanced security part in Windows Defender with Advanced Security is the part that covers creation of “special” rules that are similar to Allow rules but only if it is secure and work in conjunction with Connection security rules (that should be configured separately).
Let say that you would like to implement PAW or Jump Box or just limit admins to (even mistakenly) connect to some machines – well Allow the connection if it is secure kind of rules can help you out.
In my example I decided to have two admins: Bill and John they are using same PAW or Jump box called C2 from where they connect to web interface for management of server called SRV2 (it is an empty IIS website – but just to get the idea …).
By following previous tutorials I needed to create firewall rule to allow port 80 to be accessible as local rules are not processed (and we know that in Windows Server, when you install a Role or Feature, firewall rules are automatically created…).
When I do so I am able to access website on http://srv2 from machine C2 if John or Bill are logged in. But what if only Bill is the admin that should access http://srv2 web interface – can we somehow limit that feature for John? The answer is YES!
So first of all we need to create a new Group Policy Object where we will make a Block rule on port 80 – so nobody in the company will be able to access web service on SRV2 any more. After that we will create a new rule where we will chose the option: Allow the connection if it is secure – and as requirement for a successful connection will be that user on the machine should be Bill and machine where Bill is connecting from our PAW or Jump Box called C2. No other combination will fulfill the criteria. So if John is connected to C2 it is a wrong user. If Bill is connected to C1 and would like to do a connection a wrong computer is in use… So only valid combination of valid user and valid computer can fulfill the criteria and allow the connection. Just imagine how granularly you can configure which admin can do or access RDP / Powershell remoting, connect via MMC and other consoles… First of all we reduce potential mistakes that can be done but we are making it also difficult for potential hacker to get all the prerequisites to establish a successful connection … After that we need to create another Group Policy object where we will define Connection security rules – basically we will make PAW or Jump box in our case called C2 establish IPSec connection to SRV2 when user will try to open webpage (on TCP port 80).
Yes, we are building clustered solutions to keep as high uptime as possible but sometimes there is a planned or unplanned electrical outage or maintenance work on power lines when we are simply forced to shutdown our cluster – and in that situation we want to do it safely.
When we talk about Storage Spaces Direct (S2D) on Windows Server 2016 / 2019 / 2022 in a hyper-converged scenario (when hyper-v virtualization and storage are inside the same system) it is very important to take care of properly shut down such system not to get in problematic situations where data corruption or some other issues could emerge. Becouse of that Microsoft has a great article about how to safely and properly shutdown a node in S2D configuration.
I would like to share with you a concept that could help you with getting whole cluster safely turned off.
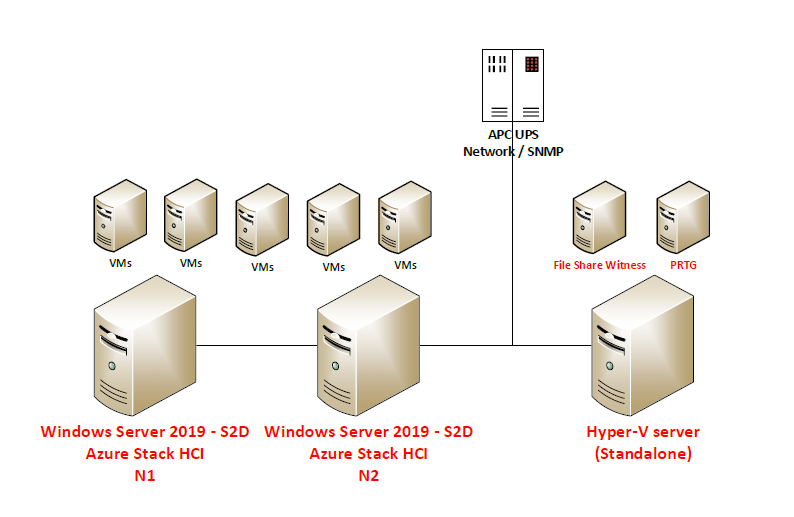
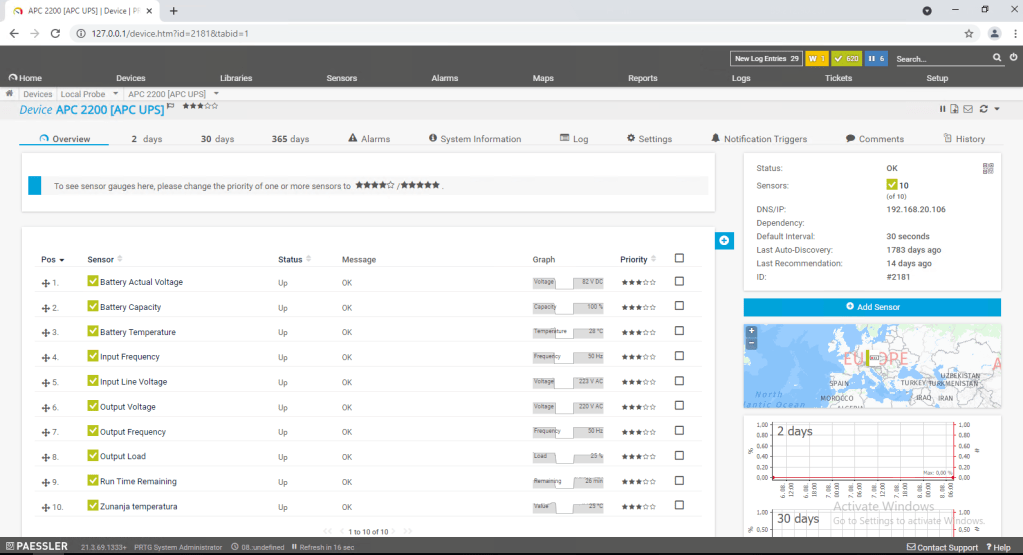
Scenario consists of 2-node S2D solution, standalone hyper-v (on which I run file share witness (for S2D)) and PRTG that by using SNMP monitors APC UPS 2200:
So first of all we need to get the information about Battery capacity by using SNMP query to APC Network management card – this will be the value that we will monitor and based on the current value we will trigger some actions.
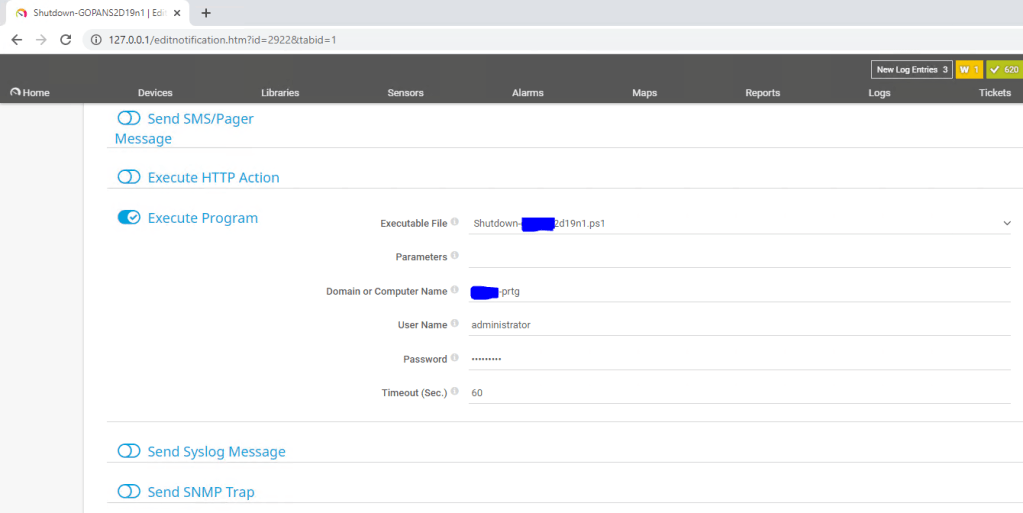
Then we need to prepare Notifications templates where we define Powershell scripts to be executed. I am using three scripts: –First script will make a graceful stop of storage services and put S2D Cluster N2 in maintenance mode (all roles will be drained to S2D Cluster N1) after that it will shut down S2D Cluster N2 –Second script will trigger shutdown of all virtual machines on S2D Cluster N1 and after 180 seconds it will shut down the S2D Cluster N1 – Third script will shut down third hyper-v host (standalone)
With the action Execute Program on our Notification Template we define which script we would like template to use and username and password that will be used only to execute the script on local machine (PRTG) – credentials for powershell remoting that will do the shutdown jobs can be safely saved separately so you do not need to enter plain-text credentials to access the hosts anywhere.
After that we need to configure triggers – when scripts will be executed based on the battery capacity – so in my case I decided to set it up like this:
When battery is on 65% turn off S2D Cluster N2 (drain roles (VMs and cluster service roles to S2D Cluster N1), put the node in maintenance mode, shut down the physical node S2D Cluster N2).
When battery is on 45% turn off S2D Cluster N1 by firs shutting down all VMs, than wait 180 seconds for shutdown to complete and then shut down physical S2D Cluster N1.
When battery is on 15% turn off standalone Hyper-V host – where our Witness and PRTG VMs are running
If we check the scriptblocks inside our scripts:
Shutdown-N2.ps1 (the script that in my case we will run first):
In first part of the script we need to setup credentials that will be used to execute powershell remoting: You can do this buy simply entering username and password into the script (Please do not do that! Powershell allows you to do it way more securely. Please read this article about securely saving encrypted password in separate file.
So the shutdown sequence will be: – when electricity is turned off and PRTG gets the info by querying UPS that capacity of the battery is under 65 %: S2D Cluster – N2 will bi gracefully stopped (by draining roles and putting it in maintenance mode and shutdown after that) – when the battery is under 45 %: S2D cluster – N1 will be gracefully stopped (by shutting down all VMs and finally shutting down) – when the battery capacity is under 15 %: Our standalone host (where PRTG and File Share Witness (needed for S2D Cluster)) will be shutdown.
The procedure to turn the system back on is the following: – First we will turn on standalone host (and Files Share Witness VM) – Please do not turn on PRTG server until UPS battery capacity is not over 65% (because PRTG will turn on the procedures again if capacity is below 65%) – When you checked that standalone host has network connectivity and File Share Witness VM is working and has connectivity too we can proceed further by turning on S2D Cluster N1 – When S2D Cluster N1 is up we can turn on VMs* (as Witness is there and N1 is fully functional you are able to start your production VMs – there will be more data to resync so if you have time it is better to wait for N2 to get back online and put it out of maintenance mode.) – We can now turn on S2D Cluster N2 and when it comes back online we need to bring it back into fully functional Cluster member state by executing the script:
TJust in case someone needs to bulk/mass update (for example) TimeToLive parameter on all A (CNAME, MX, TXT…) records in all primary zones on Windows Server 2016/2019 DNS server …
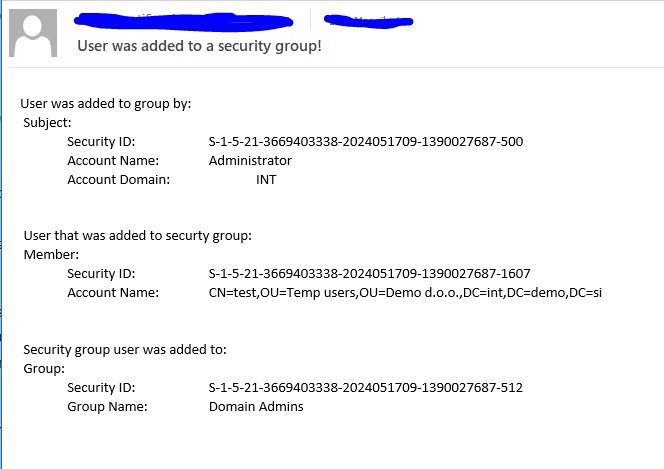
Next step is to monitor addition and/or removal of user to/from security group – in this example I will show that alert is triggered when user is added to domain admins security group.
The script is a bit modified so it covers the user that added another user to a security group, a user that was added to a security group and which group user was added to.
$Body = “User was added to group by: `n $EventMessageAccountNameTextAdmin `n `n `n User that was added to securty group: `n $EventMessageAccountNameTextUser `n `n `n Security group user was added to: `n $EventMessageAccountNameTextGroup”
I finally managed to make it work … 🙂 So this time we are trying to establish multichannel between Debian Linux with Samba 4.9.5-Debian and Windows server 2019 (that preferres SMB 3.1.1 dialect). Each of VMs on separate Hyper-V hosts has 4 virtual network adapters connected. I entered the hostnames of VMs in hosts files both – on Windows and Linux as I am not running any DNS server in the test network.
So I added 4 entries on each machine. On Debian I have created a simple smb.conf example file to make it work:
[global]
workgroup = WORKGROUP
interfaces = eth0, eth1, eth2, eth3
bind interfaces only = Yes
vfs objects = recycle aio_pthread
aio read size = 1
aio write size = 1
strict locking = No
use sendfile = no
server multi channel support = yes
server string = samba server
security = USER
encrypt passwords = yes
smb passwd file = /etc/samba/smbpasswd
guest ok = yes
[storage]
comment = Storage
path = /var/samba
writeable = yes
public = no
As you can see in video by using Linux command in terminal: smbstatus I am getting similar information as running get-smbmultichannel Powershell cmdlet on Windows. I can clearly see how servers are connected between them by using SMB protocol.
As you can see in video Windows machine, from which I am copying data to Linux utilizes all four network adapters but we are getting only 2 gigabit throughput. On Linux side there are only two NICs utilized. I was not able to make it work by using all four adapters (like machines were utilizing in previous part in Windows VM to Windows VM scenario). Well I just wanted to demonstrate that concept works also in mixed environment with Windows and Linux.
Today I wanted to update all serial numbers (to make sure that are written in YYYYMMDD00 way) on my primary DNS zones on my Windows server 2019 DNS server.
This is the script to do this massive change – by using this script anyone can modify any parameters in DNS.
We are upgrading configuration from previous part (7) so we are adding additional Virtual Network Adapters to both VMs (so each will have 4).
*** When I “hot added” network cards you can see that the throughput was bad (probably we should wait for couple of seconds or minutes for reconfiguration as new network adapters were added) – so on 56th second I am pausing the video for a VMs reboot and on 58th second I am resuming recording after VMs reboot. You can see that after reboot everything works great and we are getting maximum speed out of our 4 physical NICs in each of our Hyper-V hosts.
From physical we are moving to virtual now – so I have created a small demo of two VMs on two separate Hyper-V hosts (connected to same switch with 4 physical NICs each). Each VM has only one Virtual Network Adapter.
As we can see we are getting 1 gigabit throughput from first to second VM. We can alo see the utilization of physical NICs on our Hyper-V hosts (transfer is using only one NIC).