As many backup solutions use system of checkpoints (there are not just standard type of Checkpoints that you can do manually by using Hyper-V Manager (or Powershell) but also other types – like Recovery, Planned, Missing, Replica, AppConsistentReplica, and SyncedReplica (as per documentation).
Sometimes backup solutions are not able to clean up (Recovery) checkpoints after backup was finished so you might even not know that you have your VMs with open checkpoints in production. It can be problematic as it can fill your disk space on your hosts and then you can have problems when you remove this “orphaned” checkpoints and they need to merge to their parent VHDX.
I have created a simple Powershell script that can send you an e-mail once per day just to make sure that you can have under control situation regarding Checkpoints on your infrastructure. If there are no checkpoints there will be just a short e-mail, if there are checkpoints you will get table with VM name and Checkpoints.
To trigger this check you can use Task Scheduler and make a simple daily task like described in one of my early articles, here.
I just wanted to share a small simple Powershell Watchdog that I made for some remote machines so that in case that ethernet port goes down or IP is not reachable it performs some actions …
It will do the following (you can change / modify everything): I am triggering/running it with Task Scheduler every minute (you can change that to a longer period) – after system startup and it will run for an infinite period.
Script will try to ping 1.1.1.1 and if all packets are received back it will just wait for next cycle (in my case 1 minute). If packet is lost it will try to cycle network adapter by putting it down, wait 5 seconds and bring it back up. After that it will wait for 10 seconds and it will retry to ping – if ping is still not going it will try to reboot the operating system.
Simple Powershell ps1 script looks like:
if (Test-Connection 1.1.1.1 -Quiet)
{ write-host "Connection is UP - nothing to worry about... :)" }
else
{
Disable-NetAdapter NAMEofTHEadapter -Confirm:$false
Sleep -Seconds 5
Enable-NetAdapter NAMEofTHEadapter -Confirm:$false
write-host "Network cycled"
sleep -Seconds 10
if (Test-Connection 1.1.1.1 -Quiet)
{ write-host "After cycling network adapter connection is bac UP - nothing to worry about... :)" }
else
{Restart-Computer -Force}
}
I have saved this script into c:\watchdog\watchdog.ps1 and created an task in Task Scheduler that runs this script on system startup and repeats every 1 minute for infinite amount of time …
Security options I have set to: Run wether user is logged on or not Do not store password. Run with highest privileges
Action is to run: Powershell with Argument: -ExecutionPolicy ByPass -File C:\watchdog\watchdog.ps1
Yes, we are building clustered solutions to keep as high uptime as possible but sometimes there is a planned or unplanned electrical outage or maintenance work on power lines when we are simply forced to shutdown our cluster – and in that situation we want to do it safely.
When we talk about Storage Spaces Direct (S2D) on Windows Server 2016 / 2019 / 2022 in a hyper-converged scenario (when hyper-v virtualization and storage are inside the same system) it is very important to take care of properly shut down such system not to get in problematic situations where data corruption or some other issues could emerge. Becouse of that Microsoft has a great article about how to safely and properly shutdown a node in S2D configuration.
I would like to share with you a concept that could help you with getting whole cluster safely turned off.
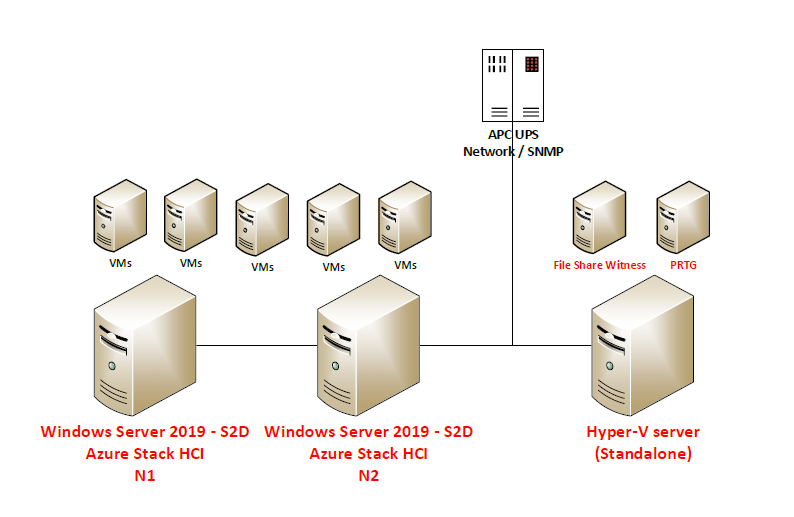
Scenario consists of 2-node S2D solution, standalone hyper-v (on which I run file share witness (for S2D)) and PRTG that by using SNMP monitors APC UPS 2200:
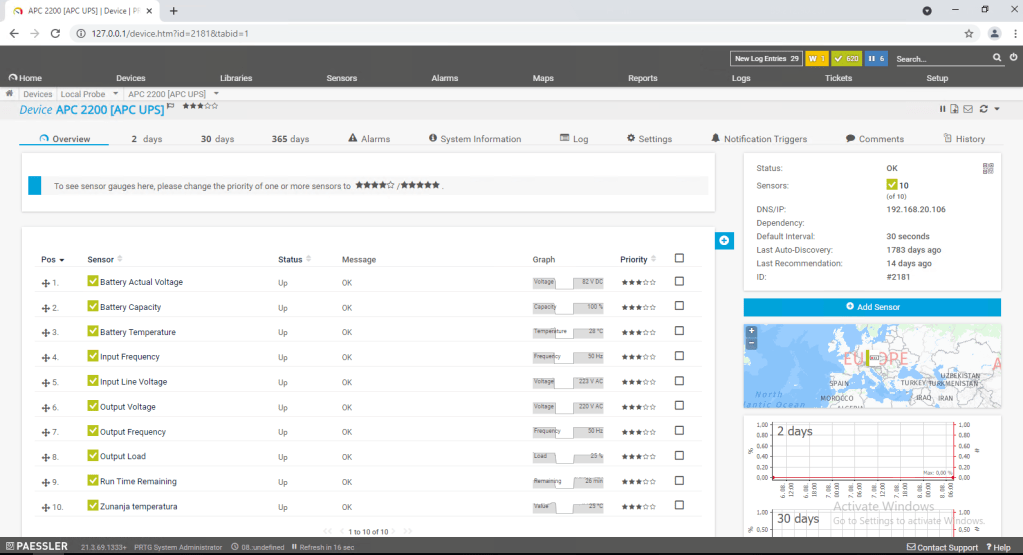
So first of all we need to get the information about Battery capacity by using SNMP query to APC Network management card – this will be the value that we will monitor and based on the current value we will trigger some actions.
Then we need to prepare Notifications templates where we define Powershell scripts to be executed. I am using three scripts: –First script will make a graceful stop of storage services and put S2D Cluster N2 in maintenance mode (all roles will be drained to S2D Cluster N1) after that it will shut down S2D Cluster N2 –Second script will trigger shutdown of all virtual machines on S2D Cluster N1 and after 180 seconds it will shut down the S2D Cluster N1 – Third script will shut down third hyper-v host (standalone)
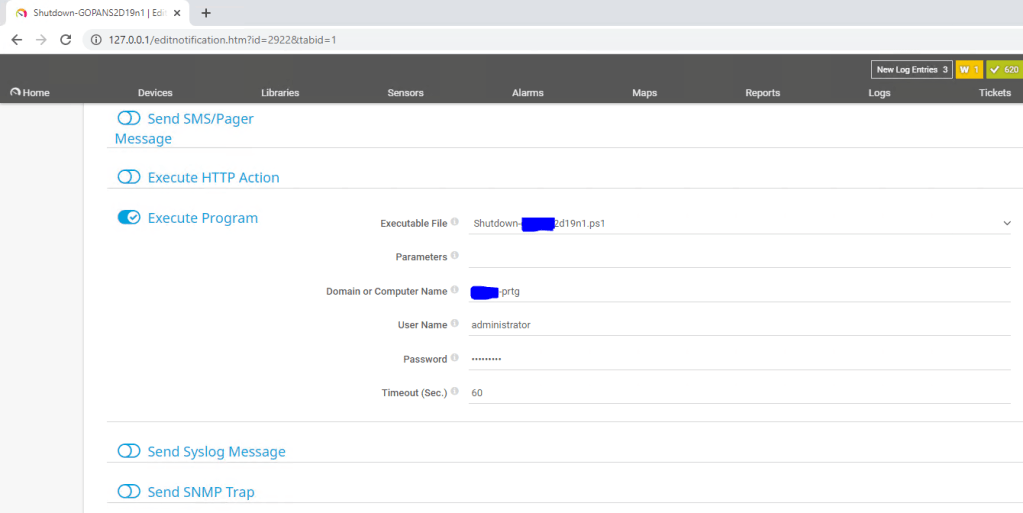
With the action Execute Program on our Notification Template we define which script we would like template to use and username and password that will be used only to execute the script on local machine (PRTG) – credentials for powershell remoting that will do the shutdown jobs can be safely saved separately so you do not need to enter plain-text credentials to access the hosts anywhere.
After that we need to configure triggers – when scripts will be executed based on the battery capacity – so in my case I decided to set it up like this:
When battery is on 65% turn off S2D Cluster N2 (drain roles (VMs and cluster service roles to S2D Cluster N1), put the node in maintenance mode, shut down the physical node S2D Cluster N2).
When battery is on 45% turn off S2D Cluster N1 by firs shutting down all VMs, than wait 180 seconds for shutdown to complete and then shut down physical S2D Cluster N1.
When battery is on 15% turn off standalone Hyper-V host – where our Witness and PRTG VMs are running
If we check the scriptblocks inside our scripts:
Shutdown-N2.ps1 (the script that in my case we will run first):
In first part of the script we need to setup credentials that will be used to execute powershell remoting: You can do this buy simply entering username and password into the script (Please do not do that! Powershell allows you to do it way more securely. Please read this article about securely saving encrypted password in separate file.
So the shutdown sequence will be: – when electricity is turned off and PRTG gets the info by querying UPS that capacity of the battery is under 65 %: S2D Cluster – N2 will bi gracefully stopped (by draining roles and putting it in maintenance mode and shutdown after that) – when the battery is under 45 %: S2D cluster – N1 will be gracefully stopped (by shutting down all VMs and finally shutting down) – when the battery capacity is under 15 %: Our standalone host (where PRTG and File Share Witness (needed for S2D Cluster)) will be shutdown.
The procedure to turn the system back on is the following: – First we will turn on standalone host (and Files Share Witness VM) – Please do not turn on PRTG server until UPS battery capacity is not over 65% (because PRTG will turn on the procedures again if capacity is below 65%) – When you checked that standalone host has network connectivity and File Share Witness VM is working and has connectivity too we can proceed further by turning on S2D Cluster N1 – When S2D Cluster N1 is up we can turn on VMs* (as Witness is there and N1 is fully functional you are able to start your production VMs – there will be more data to resync so if you have time it is better to wait for N2 to get back online and put it out of maintenance mode.) – We can now turn on S2D Cluster N2 and when it comes back online we need to bring it back into fully functional Cluster member state by executing the script:
If you follow the article on Microsoft on topic – New-StoragePool you will find out that it just takes all available disks that can be pooled into a variable. If you want to add just some of available drives into a pool you should create arraylist of disks which you can populate by using just some drives identified by its UniqueId. For example:
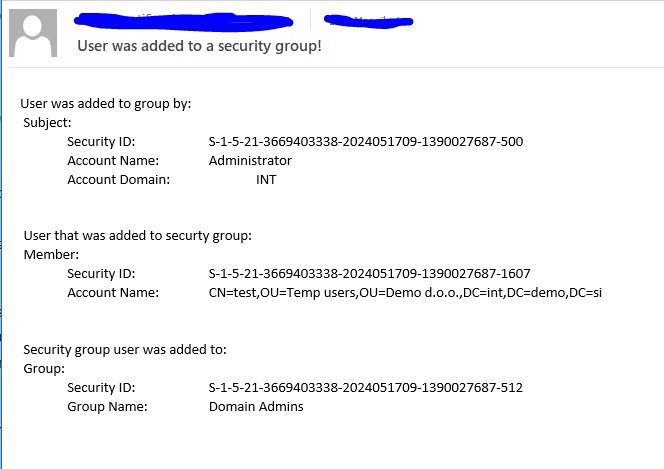
Next step is to monitor addition and/or removal of user to/from security group – in this example I will show that alert is triggered when user is added to domain admins security group.
The script is a bit modified so it covers the user that added another user to a security group, a user that was added to a security group and which group user was added to.
$Body = “User was added to group by: `n $EventMessageAccountNameTextAdmin `n `n `n User that was added to securty group: `n $EventMessageAccountNameTextUser `n `n `n Security group user was added to: `n $EventMessageAccountNameTextGroup”
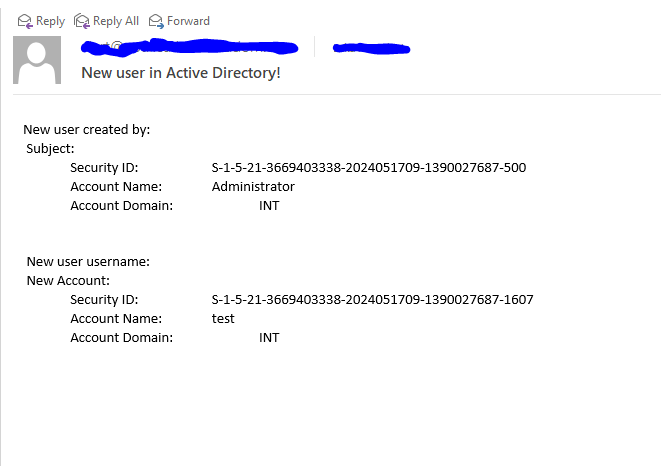
If you want to implement “poor man” monitoring of important events that can happen in your Active Directory like – creation of an user or in case if someone enables or disables an user account or if user is added to a security group (for example in domain admins) you can do it by using out-of-the box solutions that Windows Server provides.
Without touching any additional auditing (by using Group policy or Local policy) you can simply attach a task to events:
Event ID: 4720 – A user account was created. Event ID: 4722 – A user account was enabled. Event ID: 4725 – A user account was disabled. Event ID: 4728 – A member was added to a security-enabled global group.
I find these events very important because if they are not triggered by an intentional creation / modification of an user in Active Directory it might mean that someone is making some unwanted and potentially dangerous changes (and we all know how devastating for our infrastructure can be if privileges escalate to Domain admins level).
So let’s use out-of-the box solutions to get information if such event happens.
We will use: Event Viewer and the option to trigger an action of out the event id by using Task Scheduler and some Powershell scripting to get alert e-mailed to administrator.
On DC I have created a folder on c:\ps in which I have placed PS1 script called: NewUser.PS1
In the script I have some lines that parse newly created Event with ID 4720.
After that we run Task Scheduler and create new Basic task where Trigger is When a specific event is logged on next screen we chose as Log: Security then Source: Microsoft Windows security auditing. and we insert Event ID: 4720.
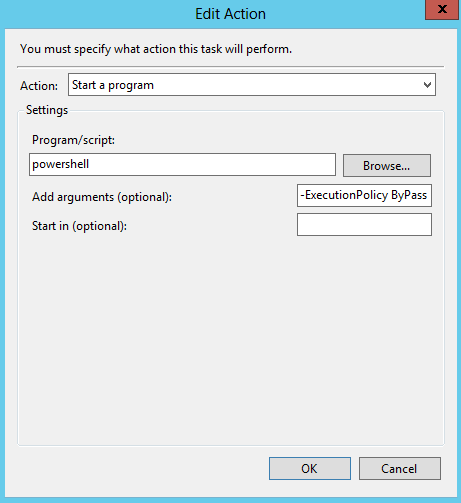
After that we need to chose Action: Start a programas Program/script: Powershell and in Add arguments (optional): -ExecutionPolicy ByPass -File c:\ps\NewUser.ps1
on Finish screen we can check checkbox Open the Properties dialog …
OnGeneraltab of task properties we can chose radio button:Run whether user is logged on or not and then checkboxDo not store password. The task will only have access to local computer resources.
If you try to create new user in AD in couple of seconds you should receive e-mail with alert where you get the user that created new user in AD and the actual username of the newly created user.
In the video you can check the tasks described above.
Today I wanted to update all serial numbers (to make sure that are written in YYYYMMDD00 way) on my primary DNS zones on my Windows server 2019 DNS server.
This is the script to do this massive change – by using this script anyone can modify any parameters in DNS.
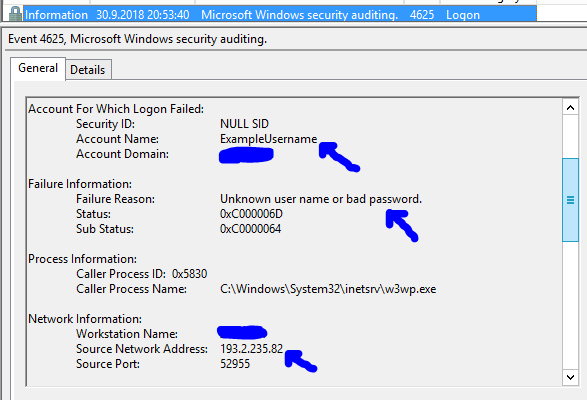
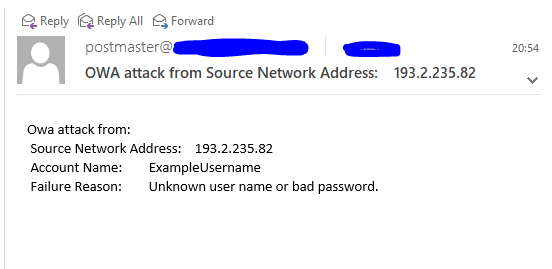
Just for fun I tried to establish a mechanism that will allow me to get information for failed logon attempt on Outlook Web Access (OWA).
If you open event viewer on your CAS server (where OWA is located) you can find out that failed requests are logged with Event ID 4625.
In general information you can find interesting things like – username which was used and IPv4 or IPv6 address from where the attempt was made.
All you need to do is to Attach task to this event
As all other actions are deprecated you should use the option to Start a program – here we will run a Powershell script to do the job.
We need to create a PS1 (powershell script) with content:
I would like to help you setting up LAPS in your environment – just follow this simple guide how to do it and say “bye bye” to not-secure fixed local administrators passwords.
Download LAPS.x64.msi on your Active Directory domain controller and install it – add also Management Tools that are not selected by default:
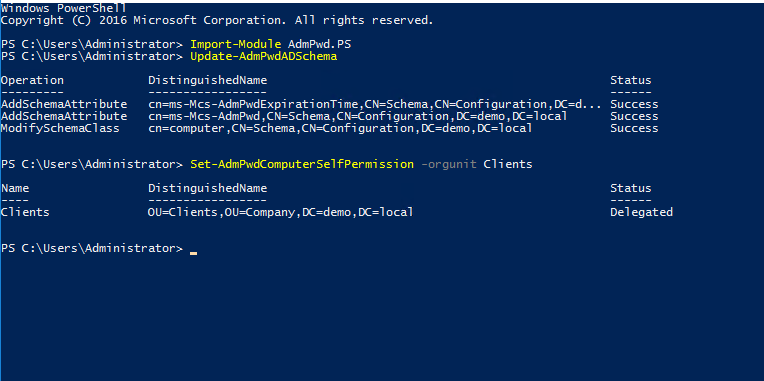
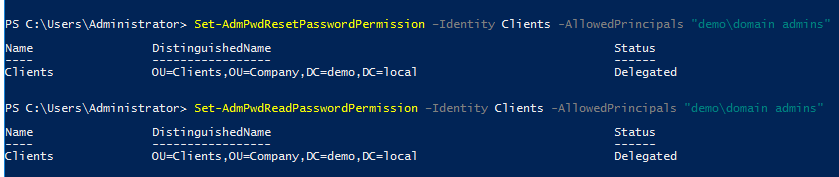
After installing it open Powershell on your DC, import Powershell module for LAPS, update AD Schema for LAPS (you need to be schema admin!), define OU where computers / servers that will be under LAPS management are, define user or group that will have privilege to read and reset password for client or server:
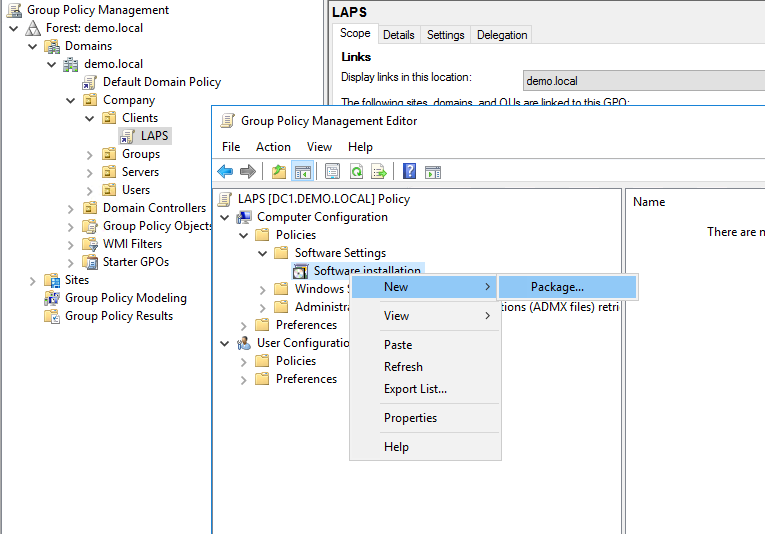
Create group policy object on clients / servers OU (in my case with name LAPS) in which you will configure settings and deploy client on machines (yes, the MSI package that was installed on DC needs to be installed on workstations and servers too – the simplest way to do it is by using software deployment in group policy.
Reboot your clients or use gpupdate /force to apply group policy settings and installation of the package.
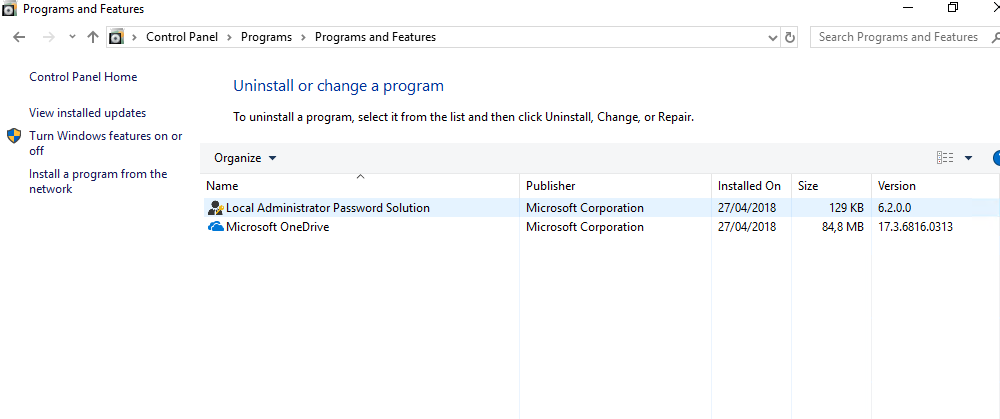
If everything was installed and applied correctly you should see the installed package in programs on client workstation or server:
On your AD server you can now check password by using Powershell or by using LAPS GUI:
Get-AdmPwdPassword -ComputerName w10 -Verbose
LAPS is great, simple and adds some more security in your environment.