We are upgrading configuration from previous part (7) so we are adding additional Virtual Network Adapters to both VMs (so each will have 4).
*** When I “hot added” network cards you can see that the throughput was bad (probably we should wait for couple of seconds or minutes for reconfiguration as new network adapters were added) – so on 56th second I am pausing the video for a VMs reboot and on 58th second I am resuming recording after VMs reboot. You can see that after reboot everything works great and we are getting maximum speed out of our 4 physical NICs in each of our Hyper-V hosts.
From physical we are moving to virtual now – so I have created a small demo of two VMs on two separate Hyper-V hosts (connected to same switch with 4 physical NICs each). Each VM has only one Virtual Network Adapter.
As we can see we are getting 1 gigabit throughput from first to second VM. We can alo see the utilization of physical NICs on our Hyper-V hosts (transfer is using only one NIC).
Finally we are approaching the solution that is giving us great bandwidth by utilizing all four network adapters – we are still using Switch embedded teaming solution to team physical interfaces directly when creating Hyper-V Virtual Switch but this time with a slightly different command in Powershell.
!Warning! When you execute this command you will remain without connectivity, so I suggest to continue with following commands and to execute them consequently. So after creating a Virtual Switch consisting of our four physical NICs and combined with embedded teaming feature we are ready to give our Hyper-V host management network cards.
Finally we are ready to test copying of files between our two Hyper-V hosts.
As you can see with teaming that is configured by using new Switch embedded teaming functionality in Hyper-V Virtual Switch and by creating four adapters for management OS (host) we are getting the same results as we did in part 1 of this series – when we were using just our 4 physical NICs without any additional configuration.
In this article we are covering new concept of teaming interfaces – used when you have Hyper-V role installed as it is only available in conjunction with Virtual Switch – that is called Switch embedded teaming (or SET) – so basically if you are using a physical server for some other roles you should still stick to “classical” NIC teaming (NetLbfo) that has been available since Windows server 2012.
Since SET is available I am using it – and I have also reconfigured some “old fashion design” configurations.
Quoting original documentation:
SET is an alternative NIC Teaming solution that you can use in environments that include Hyper-V and the Software Defined Networking (SDN) stack in Windows Server 2016/2019. SET integrates some NIC Teaming functionality into the Hyper-V Virtual Switch.
Virtual Switch that has Switch embedded teaming enabled by default uses Switch independent mode and Dynamic load distribution – you can change that in Powershell.
The next very important thing is that SET preserves RDMA functionality so you can use it in conjunction.
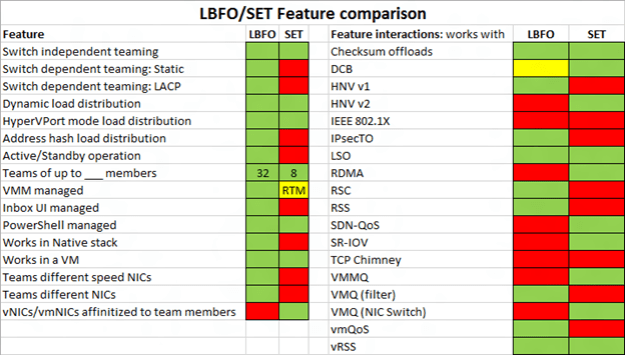
There is another great piece of documentation about “classic” team solution in Windows and Switch embedded teaming located here. I have copied the comparison table to have a quick look at features.
Out of this adapter we are getting similar configuration as we did in part 3 – so only one virtual network card for our Hyper-V host.
And just to make sure … Let’s check default configuration made by cmdlet that we just fired of load balancing and teaming mode by using Get-VMSwitchTeam cmdlet:
As you can see we are getting also the same result as in part 3 – so only 1 gigabit throughput between Hyper-V server 1 and Hyper-V server 2.
We are pushing it forward – in previous example (part 3) we made virtual switch just by simply using Hyper-V Manager (or Powershell) but with no extra configuration – the result was that when copying from server to server we got only 1 gigabit throughput.
Now, we are trying to upgrade the scenario by using Powershell (you can only do this by using Powershell or by using System Center Virtual Machine Manager (that below also uses Powershell :)) – we are going to create Virtual Switch but then we are going to assign more than just one virtual network card to host operating system (our Hyper-V host):
We simply create a virtual switch, that does not have in previous part mentioned checkbox “Allow management operating system to share this network adapter” checked so, no Virtual Network card is created – !Warning! If you run only this cmdlet you will cut yourself out of your Hyper-V host – so it is better to prepare also the second part and run it all together so we will continue by using cmdlet Add-VMNetworkAdapter:
As can be seen in the video we are getting better results than with a single virtual network adapter but still we are getting not more than 2 gigabit of bandwidth – and it is not stable.
As I told you at the beginning of this series I am a big fan of Hyper-V – I have been implementing it since 2008 (when nobody believed this would ever become a serious virtualization platform :)). So in Windows server 2012 / 2012 R2 the most common way of setting up your Hyper-V networking was to just team your NICs by using Windows provided tool and then just to create a VMSwitch on top of it – by using Hyper-V manager or Powershell and by using the checkbox Allow management operating system to share this network adapter. After this process you ended up with a new virtual NIC called for example vEthernet (Team01).
Like in previous scenario (part 2) we have 1 gigabit speed when copying files from server to server. And yes, if there was a third server we would probably start using next NIC so we would have 2 gigabit traffic from server 1 – 1 gigabit to server 2 and 1 gigabit to server 2 – but still just a gigabit to each of them.
In this video you can see that we are upgrading previous scenario (teamed NICs) by enabling Hyper-V Virtual Switch (External type) using Hyper-V Manager – you could also do that by using Powershell following the documentation.
As you probably saw in my previous post – if you leave your cards just as they are – connected to switch SMB multichannel kicks in when you start to copy something to another machine that also has multiple NICs … But what happens in server to server scenario when you team your interfaces by using teaming that is included in windows – the one that you can configure by using server manager (and of course by using PS).
Well when you team your interfaces you get a new interface (you will see an interface with Microsoft Network Adapter Multiplexor).
Well in server to server scenario it means that you have only one NIC which reduces the speed of your copying to a speed of a single card in NIC.
As you can see also in Powershell by using Get-SmbMultichannelConnection cmdlet we have just one session.
Yes, if there was a third server we would probably start using next NIC so we would have 2 gigabit traffic from server 1 – 1 gigabit to server 2 and 1 gigabit to server 2 – but still just a gigabit to each of them.
Just a quick remark … You can create teaming interface by using Server manager or you can use Powershell – more information about creating teamed interface can be found here.
I am a big fan of SMB 3.x multi-channel feature that Microsoft implemented for the first time in Windows server 2012. As I am also a big fan of Hyper-V and I want my hosts to have the ability to copy files between them (ISOs, VHDXs …) as fast as possible I wanted to create this short series of articles about multi-channel feature. I was really happy when I saw Mr. Linus Sebastian posted a video Quadruple Your Network Speed for $100 with SMB 3.0 Multichannel!so I decided to create a small series of videos to also see what advantages of using it in a production environment are and why.
For this test I used 2xDell R730xd with 2 CPUs (Xeon E5-2620) and with Dell Intel I350 Quad-Port Gigabit Ethernet and MikroTik switch CRS226-24G-2S+.
So in this first part I would like to show, how SMB 3.x multichannel (I am putting that x there as SMB versions are changing (table at point 4) in each release of Windows server (and client too!) works.
In this demo I will be using Windows server 2019 which uses SMB dialect 3.1.1. You can check the dialect that your servers / clients are using by typing following cmdlet in Powershell: Get-SmbConnection
In the following video you can see the first example – two servers connected with 4 NICs each to the switch – without any extra configuration (there are no IP addresses configured) but you can see that when we copy files from server 1 to server 2 we utilise all 4 NICs on server 1 and all 4 NICs on server 2 – it can be clearly seen also on switch. To get information how your server utilizes SMB 3.x multichannel you can use Powershell cmdlet: Get-SmbMultichannelConnection
It is time to migrate last Exchange 2010 servers as they are going end of support soon …
As I am doing this migrations I just wanted to put some Powershell cmdlets into this blog post that can be useful when doing it.