Category Archives: MS Windows server

Windows Server 2025 – Storage Spaces Direct (S2D) Campus Cluster – How does it handle problems / disaster scenarios – part 3 – Bring online the only remaining node – FixQuorum, Force Cluster Start …

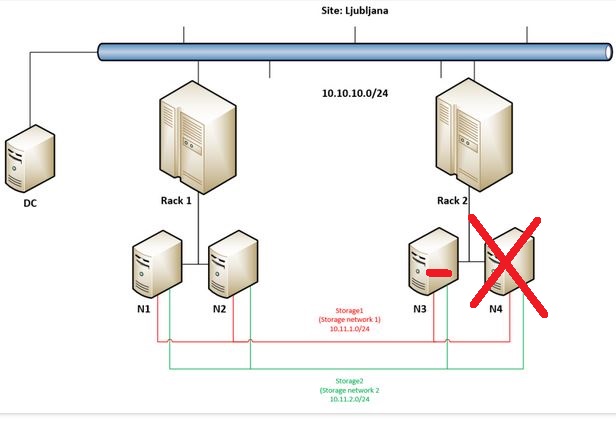
Again – probability of such scenario is in my opinion minimal but I just wanted to push our Campus Cluster to it’s limits – in previous post we have ended with this state:

When N2 went offline cluster immediately stopped working as there were not enough votes. In such case administrator has the option to make it run forcefully by “forcing quorum” and force start cluster service.

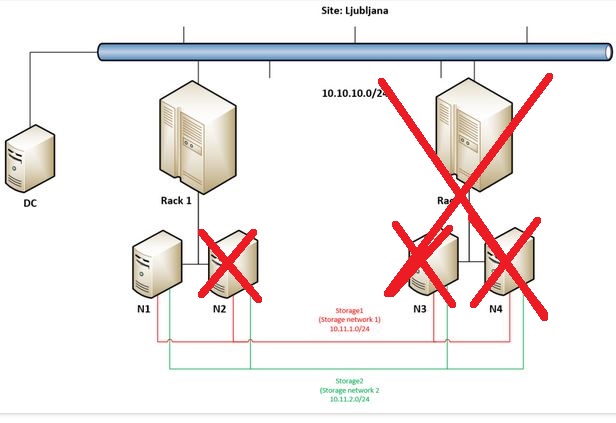
But let’s get back to the main idea why going into Campus Cluster scenario – to really have the option to built a very robust / resilient storage solution. This demo will demonstrate this robustness so we are going on by forcing remaining node in Rack 1 (N1) to start storage and VMs.

At the beginning of the video I am firing up Powershell on N1 as I need a cmdlet that will allow me to bring things online again:

Start-ClusterNode -Name N1 -FixQuorum

In couple of seconds we should get the information that node is in joining state.

I am turning on Failover Cluster Manager and on the left side in Actions you can see Start Cluster (I am trying that first 🙂 ) and Force Cluster Start – that will run with “ForceQuorum” option. We are getting many warnings at this point but it is a normal behavior in such state.

At 4:26 we can already see some Roles showing up, at 4:42 I am trying to turn off the machines that are in Paused-Critical in Hyper-V console … I made a mistake here – I forgot to move to Storage / Disks in Failover Cluster Manager where I should try to bring Cluster Shared Volumes online – when I did this (at 5:35).

While waiting for Virtual Machine Connection to connect to now running two VMs (those that were running on FourCopy Volumes I am jumping into Window Admin Center which is now showing data again – we can observe (at 8:29) that we have only 8 disks alive (of 32).
At (8:56) we can see that both VMs are online – we are also able to log into them so the operating system works.

So we can see that Campus Cluster can be extremely redundant, resilient, robust in terms of protecting your data – and YES – you can get into running VMs even by forcing last remaining node to run cluster.

But and and just because we were already here…

At 10:21 I am showing that 8 disks are available in N1 (via Failover Cluster Manager / Storage / Pools) and at the end of this demo I am removing another disks from N1 – by doing so I am making everything going into paused state – CSVs are offline, VMs stop responding … But this part was made just for fun as you just can not get that unlucky. 🙂 Hope you have a backup because that is the only way get your data back from such disaster …


Windows Server 2025 – Storage Spaces Direct (S2D) Campus Cluster – How does it handle problems / disaster scenarios – part 2 – sequence of failures – N2 in Rack 2, disk in N1 in Rack 2, N1 in Rack 2 (whole Rack 2 offline), N2 in Rack 1 – cluster quorum failure …

In this part I will try to go through a scenario with really low probability except if you are damn’ unlucky 🙂
I would like to show the resiliency of Storage Spaces Direct in Campus Cluster scenario so what we are going to showcase in this demo is:

– first we will simulate failure of node 2 (N4) in Rack 2
– second – I will remove a healthy disk from node 1 (N3) in Rack 2
– third – I will simulate failure of second node (N3) in Rack 2 (the one that had one disk missing)
– fourth – I will simulate failure of node 2 (N2) in Rack 1 – so the only “survivor” will be node 1 (N1) in Rack 1 that will not continue to work as it will remain in minority – we will cover that scenario in part 3. 🙂

In this part I am introducing also Windows Admin Center to have a better view (even with some delay 🙂 ) of what is going on in the cluster.
So we are staring the scenario by checking Volumes via Windows Admin Center and getting through the disks that are available in our cluster (each of the four nodes have 8 disks dedicated to S2D solution).

At 0:53 I have done a dirty shutdown (Turn off) of N4 and you can see that it went into Isolated state before going into Down. And also virtual machine running on it went into Unmonitored state before being restarted on N2 (in Rack 1), so I am moving (by using Live Migration) it back to remaining node (N3) in Rack 2.

At 1:36 I am checking current situation with disks and I can see that only disks in N4 are missing (as that node is turned offf) but at 2:25 additional disk has “failed” in N3. But as we move to Volumes / Inventory we can see that all volumes are in state “Needs Repair” but with green checkmark so everything is still working and storage is available to workloads (VMs). I am also checking if VMs are online (I am pausing video for couple of seconds as VMC sometimes needs some time to show the console of the VM).

At 3:48 we can observe that also N3 so the remaining node in Rack 2 went offline (it become Isolated and later goes to status Down), VMs running on Rack 2 went into Unmonitored state and after approximately 10 seconds they are being restarted on nodes (N1 and N2) in Rack 1.


Everything is still working only all workloads (VMs) are now in Rack 1, and when I check Volumes / Inventory in Windows Admin Center we can still see that everything is green but needs repair.
In Drives we can see that half of available disks are missing (16 of 32) – the same, even with more details it can be seen in Drives Inventory.

Our Sysadmin is extremely unlucky today:
At approximately 4:58 another disastrous situation happen – N2 in Rack 1 fail. As there are four nodes in this cluster and there is only one node still available cluster stops working – you can see that I am not able to refresh Nodes or Roles in Failover Cluster Manager – Windows Admin Center is showing outdated situation as it can not connect to Cluster anymore.

So in this part we will end here – but as we have setup Four Copy Cluster Shared Volumes (you can check it here) there should be still some hope for our data (spoiler alert: Yes!)? Follow me to the next part.

Windows Server 2025 – Storage Spaces Direct (S2D) Campus Cluster – How does it handle problems / disaster scenarios – part 1 – Rack 2 offline

In this first part I will go through the situation when one of two racks (in our case Rack 2) in our 4 node Campus Cluster scenario goes offline (simulating electricity or network connectivity outage …).


I am running 4 virtual machines (two small (MikroTik Cloud Hosted Router (CHR) and two a bit larger (Microsoft Azure Linux 3.0)) two in Rack 1 and two in Rack 2 on our Two Copy and Four Copy Cluster Shared Volumes – as can be seen at the beginning of the video.

What I am doing is this video is also reducing the timer of ResiliencyDefaultPeriod (which is by default set to 240 seconds (4 minutes)) to 10 seconds – as I do not want you to wait for 4 minutes to see my VMs coming online in Rack 1 🙂
I am reducing this timer also in production environments as I was (until now! 🙂 ) setting up mostly 2 node S2D clusters which are connected back to back, so waiting for 4 is in my oppinion a bit too long. Anyway, you can leave it also on default value.

At 1:25 I am dirty shutting down (Turn Off) nodes N3 and N4 (both in Rack 2) so you can see that machines in Rack 2 (on node N3) are going in Unmonitored state (for ten seconds (as defined by ResiliencyDefaultPerios) and in approximately at 1:36 they are restarted on nodes in Rack 1. We can also observe that nodes are down in Nodes tab in Failover Cluster Manager.

Next I wanted to show you that new background storage repair jobs are created which can be checked (on any node) by using Powershell cmdlet: Get-StorageJob

At 2:55 I am starting missing two nodes (N3 and N4 in Rack 2) again so we can see them joining the cluster again and in couple of seconds we can re-check storage jobs that are getting started (at 3:28) in the background and the data is re-synchronized between nodes from Rack 1 and Rack 2.

At 3:58 you can see that sometimes refresh makes problem to good old Failover Cluster Manager Console so I am just re-launching it again …
At the end of the video you can see that all nodes are green again, we can move VMs back to Rack 2 and there are no background storage jobs waiting – it means that everything was handled correctly by Storage Spaces Direct.


Windows Server 2025 – Storage Spaces Direct (S2D) Campus Cluster – part 1 – Preparation and deployment

And finally it is here! An update for Windows Server 2025 that we were waiting for and it is allowing us to create so called Campus Cluster. You can read more about it at the official Microsoft statement, here.

My demo setup looks like this – we have site called Ljubljana there are two racks Rack 1 and Rack 2 and in each rack we have two nodes (in Rack 1 we have N1 and N2 and in Rack 2 we have N3 and N4).

These four servers are domain joined (we have an extra VM called DC with Windows Server 2025 and Active Directory installed), they are connected to “LAN” network of the site with subnet 10.10.10.0/24 and each node has additional two network cards, one connected to a network that I call Storage network 1 with subnet 10.11.1.0/24 and Storage network 2 with subnet 10.11.2.0/24. Storage networks should be RDMA enabled (10, 25, 40, 100 Gbps) low latency, high bandwidth networks – don’t forget to enable Jumbo frames on them (if possible (it should be :))).

It looks like this:


To be able to setup hyper-converged infrastructure (HCI) with Storage Spaces Direct you need Failover Cluster feature and Hyper-V role installed on server. I am doing it via Powershell:

(This cmdlet will require reboot as Hyper-V is installed…)
Enable-WindowsOptionalFeature -Online -FeatureName Microsoft-Hyper-V -All

Install-WindowsFeature -Name Hyper-V -IncludeManagementTools

Install-WindowsFeature Failover-Clustering -IncludeManagementTools

When prerequisites are meet I will run cmdlet to form a cluster C1 with nodes N1-N4, with static IP address in the “LAN” segment and no storage (as I do not have any at this moment:

New-Cluster -Name C1 -Node n1, n2, n3, n4 -StaticAddress 10.10.10.10 -NoStorage


Before enabling Storage Spaces Direct you need to define Site, Racks and Nodes in those Racks. I have formed a typical site Ljubljana (Slovenian capital city) in that site I have created two racks in virtually two datacenters: DC1 and DC2 and I put those racks in site Ljubljana, then I added nodes in racks.

You can do it by using Powershell cmdlets:

New-ClusterFaultDomain -Name Ljubljana -FaultDomainType Site
New-ClusterFaultDomain -Name DC1 -FaultDomainType Rack
New-ClusterFaultDomain -Name DC2 -FaultDomainType Rack
Set-ClusterFaultDomain -Name DC1 -FaultDomain Ljubljana
Set-ClusterFaultDomain -Name DC2 -FaultDomain Ljubljana
Set-ClusterFaultDomain -Name N1 -FaultDomain DC1
Set-ClusterFaultDomain -Name N2 -FaultDomain DC1
Set-ClusterFaultDomain -Name N3 -FaultDomain DC2
Set-ClusterFaultDomain -Name N4 -FaultDomain DC2

At the end you should have something like this if you go with Powershell cmdlet: Get-ClusterFaultDomain

When this is done you can proceed with enabling Storage Spaces Direct where you will be first asked if you want to perform this action (like every time when you enabled it until now) but coupe of seconds later you will be prompted again as now, system understood that we have site and racks and nodes in different racks.

Prompt will inform you that: Set rack fault tolerance on S2D pool. This is normally racommended on setups with multiple racks continue with Y (Yes).

In couple of seconds you can already observe newly created Cluster Pool 1 that will consist of all disks from all nodes (in my case 32 disks as every node has 8 disks dedicated for Storage Spaces Direct).

As by official documentation you should perform update storage pool by using Powershell cmdlet:

Get-StoragePool S2D* | Update-StoragePool

You will be prompted with information that StoragePool will be upgraded to latest version and that this is irreversible action – proceed with Y (Yes).

Check that the version is now 29 by using:

(Get-CimInstance -Namespace root/microsoft/windows/storage -ClassName MSFT_StoragePool -Filter ‘IsPrimordial = false’).CimInstanceProperties[‘Version’].Value

Now you can proceed with forming disks – 4 copy mirror (for most important VMs) or 2 copy mirror (for less important workloads).

I modified a bit official examples for fixed and thin provisioned 2 way or 4 way mirror disks and I used this oneliners:

New-Volume -FriendlyName “FourCopyVolumeFixed” -StoragePoolFriendlyName S2D* -FileSystem CSVFS_ReFS –Size 20GB -ResiliencySettingName Mirror -PhysicalDiskRedundancy 3 -ProvisioningType Fixed -NumberOfDataCopies 4

New-Volume -FriendlyName “FourCopyVolumeThin” -StoragePoolFriendlyName S2D* -FileSystem CSVFS_ReFS –Size 20GB -ResiliencySettingName Mirror -PhysicalDiskRedundancy 3 –ProvisioningType Thin -NumberOfDataCopies 4

New-Volume -FriendlyName “TwoCopyVolumeFixed” -StoragePoolFriendlyName S2D* -FileSystem CSVFS_ReFS –Size 20GB -ResiliencySettingName Mirror -PhysicalDiskRedundancy 1 -ProvisioningType Fixed

New-Volume -FriendlyName “TwoCopyVolumeThin” -StoragePoolFriendlyName S2D* -FileSystem CSVFS_ReFS –Size 20GB -ResiliencySettingName Mirror -PhysicalDiskRedundancy 1 -ProvisioningType Thin

In next episode I will put some workloads on this nodes and simulate failures to see how Campus Cluster handles them.

More information also from my colleagues MVPs:
https://splitbrain.com/windows-server-campus-clusters/

Inaccessible Boot Device – Windows Server 2012 R2 on Windows Server 2025 Hyper-V (updated september 2025)

For more than a month I was trying to get an old Windows Server 2012 R2 VM running on fully patched Windows Server 2025 with Hyper-V. In September 2025 I needed to speed up this process so I was searching the internet for a possible solution. In fact something has changed (and deployed via Windows Update) on Windows Server 2025 and/or Hyper-V that causes this problem – I have also went through this thread but adding new SCSI controller did not help..

After removing (in September 2025) update KB5063878 Windows Server 2012 R2 VM booted without problems:

Monitor Hyper-V hosts and/or clusters for VM checkpoints using Powershell (backup leftovers, forgotten checkpoints …)

As many backup solutions use system of checkpoints (there are not just standard type of Checkpoints that you can do manually by using Hyper-V Manager (or Powershell) but also other types – like Recovery, Planned, Missing, Replica, AppConsistentReplica, and SyncedReplica (as per documentation).

Sometimes backup solutions are not able to clean up (Recovery) checkpoints after backup was finished so you might even not know that you have your VMs with open checkpoints in production. It can be problematic as it can fill your disk space on your hosts and then you can have problems when you remove this “orphaned” checkpoints and they need to merge to their parent VHDX.

I have created a simple Powershell script that can send you an e-mail once per day just to make sure that you can have under control situation regarding Checkpoints on your infrastructure. If there are no checkpoints there will be just a short e-mail, if there are checkpoints you will get table with VM name and Checkpoints.

To trigger this check you can use Task Scheduler and make a simple daily task like described in one of my early articles, here.

$VMCheckpoint = $null
$VMCheckpoint = get-vm | Get-VMCheckpoint
$VMCheckpointBody = get-vm | Get-VMCheckpoint | Select VMName, Name | ConvertTo-Html

If ($VMCheckpoint -eq $null) {
    $EmailTo = "it@mycompany.com"
    $EmailFrom = "hyper-v-checkpoints@mycompany.com"
    $Subject = "HYPER-VHOST01 - No Hyper-V Checkpoints found." 
    $Body = "Hi, IT! <br><br><br>There are no checkpoints on host HYPER-VHOST01. We will check again in 24 hours! <br><br><br>Armadillo Danilo"
    $SMTPServer = "smtp.mycompany.com" 
    $SMTPMessage = New-Object System.Net.Mail.MailMessage($EmailFrom,$EmailTo,$Subject,$Body)
    $SMTPMessage.IsBodyHTML=$true
    $SMTPClient = New-Object Net.Mail.SmtpClient($SmtpServer, 587) 
    $SMTPClient.EnableSsl = $true
    $SMTPClient.Credentials = New-Object System.Net.NetworkCredential("smtpauthusername", "smtpauthpassword"); 
    $SMTPClient.Send($SMTPMessage)
}

Else {
    $EmailTo = "it@mycompany.com"
    $EmailFrom = "hyper-v-checkpoints@mycompany.com"
    $Subject = "HYPER-VHOST01 - Warning! Hyper-V Checkpoints found!" 
    $Body = $VMCheckpointBody
    $SMTPServer = "smtp.mycompany.com" 
    $SMTPMessage = New-Object System.Net.Mail.MailMessage($EmailFrom,$EmailTo,$Subject,$Body)
    $SMTPMessage.IsBodyHTML=$true
    $SMTPClient = New-Object Net.Mail.SmtpClient($SmtpServer, 587) 
    $SMTPClient.EnableSsl = $true
    $SMTPClient.Credentials = New-Object System.Net.NetworkCredential("smtpauthusername", "smtpauthpassword"); 
    $SMTPClient.Send($SMTPMessage)
}

Windows Server 2025 – Stretched cluster with S2D

As we are expecting final release of Windows Server 2025 we can take a look at Stretched cluster capability in combination with Storage Spaces Direct (S2D).

In this quick demo I have setup a 4 node S2D stretched cluster between two Active Directory Sites and Services subnets (as Failover Cluster is using subnets in ADDS to determine in which site nodes are residing).

In my case I have Default First Site Name (Ljubljana) and another site called Portoroz. In Ljubljana our nodes are in segment 10.5.1.0/24 and in Portoroz in 10.5.2.0/24

We have two virtual machines located in a dedicated (stretched) VLAN (5) so they are in same subnet no matter on which node they are running.

Two VMs have IPs: 10.5.5.111 (vm1) and 10.5.5.112 (vm2) that I am live migrating to remote nodes (sitebn1 / sitebn2).

We have two options on how to deploy and use such scenario – we can use it in active / active mode so VMs and CSVs are on both sites and CSVs (synchronous) replicated to other pair of nodes. There is also the possibility to use it in active / passive mode so by just replicating CSVs from site 1 to site 2.

For demo purposes I have reduced the time that cluster starts its processes to establish availability of failed resources from 240 (4 minutes) seconds to 10 seconds.
Value of 240 seconds is there since Windows Server 2016 and introduction of so called compute resiliency that allowed this 4 minutes for nodes to return from let say network outage or something like that. You can reduce this timer by using Powershell:

(Get-Cluster).ResiliencyDefaultPeriod = ValueInSeconds

In the video you can see that I am live migrating VM first to site 2 and afterwards turning off the nodes in site 2. In around 15 seconds VM2 is available again this time on CSV (volume02) that was brought online on site 1.


I think this concept can be interesting for many customers and I am really looking forward for the final release of Windows Server 2025! Good job, Microsoft!

AD-less live migration in Windows Server 2025 (preview)

Today I was playing around with Windows Server 2025 (preview). One interesting feature is that is now possible to built Hyper-V cluster (in this case with “traditional” storage (I have presented it via iSCSI)) without Active Directory domain.

In previous versions it was possible to built so called workgroup clusters but in Hyper-V context it was not recommended and also a bit useless as it supported only quick and not live migration.

Well Microsoft did a great job by supporting workgroup clusters also with Hyper-V.

Here is a video that shows two node workgroup cluster and live migration of a small Ubuntu VM. 🙂 Enjoy!

Windows Defender Firewall with Advanced Security – what is that Advanced Security part? Let’s remove the dust … (Part 4 – Allow the connection if it is secure rules and Connection security rules (IPSec) and limit to certain application)

In this last post regarding security that you can apply by using Windows Defender Firewall with Advanced Security I would like to point out another option that is available when you start to configure more complex scenarios by using Connection security rules.

In this example I will force user (in this case Bill) that needs to connect from a specific workstation (PAW) (in this case C2) to use specific application (in this case Firefox) to access the web site on server (in our case SRV2). You will see that connection will not be established if Bill uses Edge (or some other browser).

This example can be an starting point to not only allow the connection to some servers services by using combination of correct user from correct workstation but also application that should be used for such connection.

Publish Remote Desktop Gateway (RDGW) with Fortigate and Let’s Encrypt

I just managed to publish Remote Desktop Gateway through Fortigate but not in a way of doing simple port forwarding but in reverse proxy concept so SSL is terminated on Fortigate and then forwarded to Remote Desktop Gateway. The cool thing is that Fortigate can now use Let’s Encrypt also with multiple subject names (also other domain names if you want (as seen in my example)) … I find it simply great that I can leverage certification renewal + extra firewall policies (like Geography) to Fortigate and let Windows Server to work only as Remote Desktop Gateway (on which I do not need to take care of certificates any more…).

I created a simple Virtual IP where I forwarded port 443 on public IP to 443 on internal IP:

After that I created Firewall Policy rule:

The important part comes here at SSL Inspection:


As you can see I am using two certificates (automatically generated with Let’s Encrypt using Fortigate) with not only multiple subject names on same domain but even different TLD.


There is a (small) trick – you need to enable RCP over HTTP on Fortigate for Remote Desktop Gateway functionality to work – and it is done in command line:

config firewall profile-protocol-options
    edit 0
        set rpc-over-http enable
    end

After that you are ready to establish Remote Desktop Connection over Remote Desktop Gateway that is published via Fortigate with certificates that are automatically renewed by Fortigate.