Yes, we are building clustered solutions to keep as high uptime as possible but sometimes there is a planned or unplanned electrical outage or maintenance work on power lines when we are simply forced to shutdown our cluster – and in that situation we want to do it safely.
When we talk about Storage Spaces Direct (S2D) on Windows Server 2016 / 2019 / 2022 in a hyper-converged scenario (when hyper-v virtualization and storage are inside the same system) it is very important to take care of properly shut down such system not to get in problematic situations where data corruption or some other issues could emerge. Becouse of that Microsoft has a great article about how to safely and properly shutdown a node in S2D configuration.
I would like to share with you a concept that could help you with getting whole cluster safely turned off.
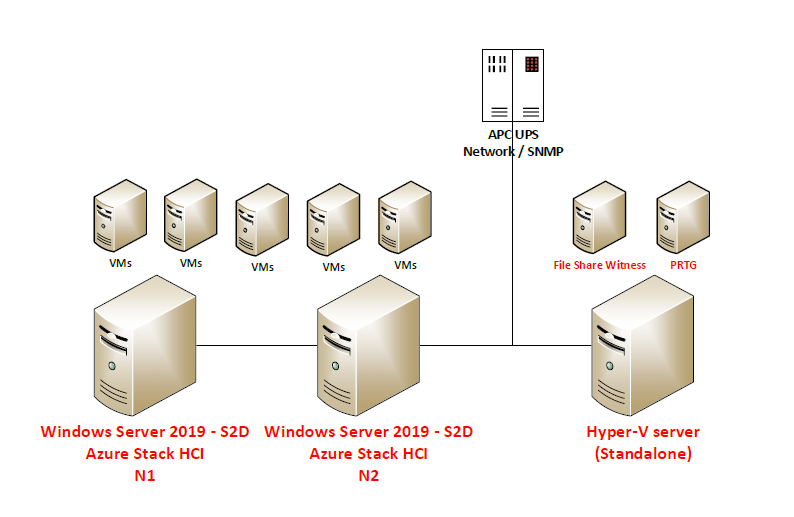
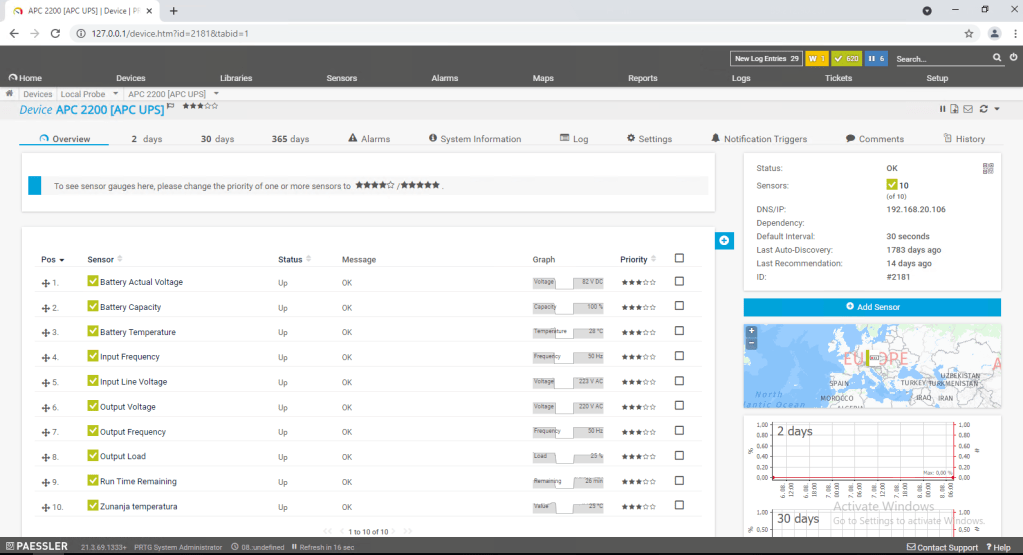
Scenario consists of 2-node S2D solution, standalone hyper-v (on which I run file share witness (for S2D)) and PRTG that by using SNMP monitors APC UPS 2200:
So first of all we need to get the information about Battery capacity by using SNMP query to APC Network management card – this will be the value that we will monitor and based on the current value we will trigger some actions.
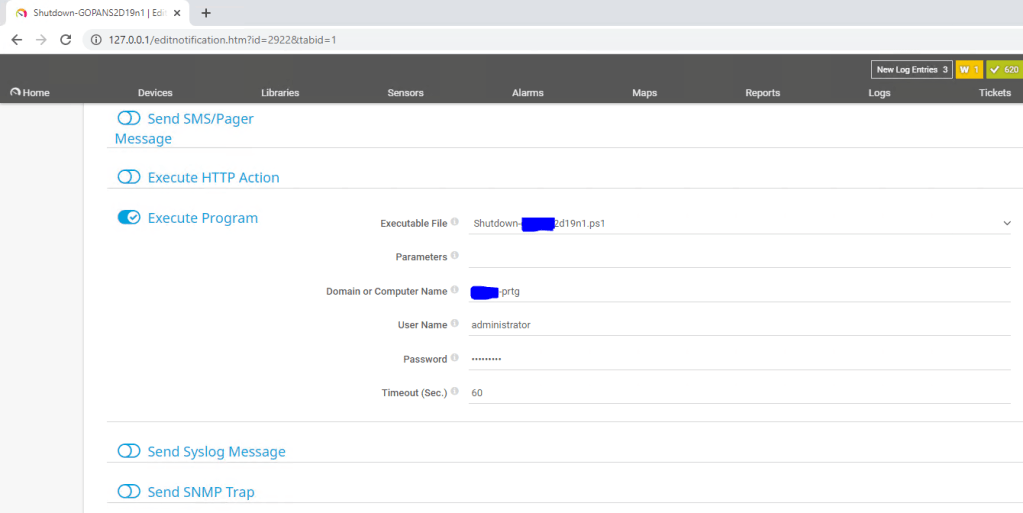
Then we need to prepare Notifications templates where we define Powershell scripts to be executed.
I am using three scripts:
– First script will make a graceful stop of storage services and put S2D Cluster N2 in maintenance mode (all roles will be drained to S2D Cluster N1) after that it will shut down S2D Cluster N2
– Second script will trigger shutdown of all virtual machines on S2D Cluster N1 and after 180 seconds it will shut down the S2D Cluster N1
– Third script will shut down third hyper-v host (standalone)

With the action Execute Program on our Notification Template we define which script we would like template to use and username and password that will be used only to execute the script on local machine (PRTG) – credentials for powershell remoting that will do the shutdown jobs can be safely saved separately so you do not need to enter plain-text credentials to access the hosts anywhere.
After that we need to configure triggers – when scripts will be executed based on the battery capacity – so in my case I decided to set it up like this:
- When battery is on 65% turn off S2D Cluster N2 (drain roles (VMs and cluster service roles to S2D Cluster N1), put the node in maintenance mode, shut down the physical node S2D Cluster N2).
- When battery is on 45% turn off S2D Cluster N1 by firs shutting down all VMs, than wait 180 seconds for shutdown to complete and then shut down physical S2D Cluster N1.
- When battery is on 15% turn off standalone Hyper-V host – where our Witness and PRTG VMs are running
If we check the scriptblocks inside our scripts:
Shutdown-N2.ps1 (the script that in my case we will run first):
In first part of the script we need to setup credentials that will be used to execute powershell remoting:
You can do this buy simply entering username and password into the script (Please do not do that! Powershell allows you to do it way more securely. Please read this article about securely saving encrypted password in separate file.
Invoke-Command -ComputerName S2D-N2 -Credential $credential -ScriptBlock {
$nodename = ‘S2D-N2’
Suspend-ClusterNode -Name S2D-N2 -Drain -Wait
Get-StorageFaultDomain -type StorageScaleUnit | Where-Object {$_.FriendlyName -eq $nodename} | Enable-StorageMaintenanceMode
Stop-ClusterNode -name S2D-N2
Start-Sleep -Seconds 10
Stop-Computer -Force
}
Shutdown-N1ps1 (the second script that will be executed – this will turn off VMs and finaly S2D Cluster N1):
Invoke-Command -ComputerName S2D-N1 -Credential $credential -ScriptBlock {
Get-VM | Stop-VM -Force -AsJob
Start-Sleep -Seconds 180
Stop-Computer -Force
}
Shutdown-HyperV.ps1 (the third script that will turn off stand alone Hyper-V host):
Invoke-Command -ComputerName StandaloneHyperV -Credential $credential -ScriptBlock {
Stop-Computer -Force
}
So the shutdown sequence will be:
– when electricity is turned off and PRTG gets the info by querying UPS that capacity of the battery is under 65 %:
S2D Cluster – N2 will bi gracefully stopped (by draining roles and putting it in maintenance mode and shutdown after that)
– when the battery is under 45 %:
S2D cluster – N1 will be gracefully stopped (by shutting down all VMs and finally shutting down)
– when the battery capacity is under 15 %:
Our standalone host (where PRTG and File Share Witness (needed for S2D Cluster)) will be shutdown.
The procedure to turn the system back on is the following:
– First we will turn on standalone host (and Files Share Witness VM)
– Please do not turn on PRTG server until UPS battery capacity is not over 65% (because PRTG will turn on the procedures again if capacity is below 65%)
– When you checked that standalone host has network connectivity and File Share Witness VM is working and has connectivity too we can proceed further by turning on S2D Cluster N1
– When S2D Cluster N1 is up we can turn on VMs* (as Witness is there and N1 is fully functional you are able to start your production VMs – there will be more data to resync so if you have time it is better to wait for N2 to get back online and put it out of maintenance mode.)
– We can now turn on S2D Cluster N2 and when it comes back online we need to bring it back into fully functional Cluster member state by executing the script:
$ClusterNodeName = ‘S2D-N2’
Start-ClusterNode -name $ClusterNodeName
Get-StorageFaultDomain -type StorageScaleUnit | Where-Object {$_.FriendlyName -eq $ClusterNodeName} | Disable-StorageMaintenanceMode
Resume-ClusterNode -Name $ClusterNodeName -Failback Immediate
After executing the script you can check the progress of storage re-synchronization by executing Powershell cmdlet: Get-StorageJob
When UPS battery capacity reaches over 65% you can turn on your PRTG monitoring system again.