Today I was playing around with Windows Server 2025 (preview). One interesting feature is that is now possible to built Hyper-V cluster (in this case with “traditional” storage (I have presented it via iSCSI)) without Active Directory domain.
In previous versions it was possible to built so called workgroup clusters but in Hyper-V context it was not recommended and also a bit useless as it supported only quick and not live migration.
Well Microsoft did a great job by supporting workgroup clusters also with Hyper-V.
Here is a video that shows two node workgroup cluster and live migration of a small Ubuntu VM. 🙂 Enjoy!
Yesterday I was asked to help colleague to properly setup IPv6 that he received by Starlink. Starlink uses CGN (Carrier Grade NAT) so you are “sharing” public IP address with other users so it is not possible to “port forward” services on your router to your internal servers. But Starlink provides you with /56 IPv6 prefix delegation – it means that you can have 256 /64 prefix networks inside your home or company. That’s great!
So first thing is to have a router (in our case MikroTik) that uses IPv6 DHCP-Client to receive IPv6 /56 prefix. After that you need to assign (let say first) /64 prefix to your internal interface (Please remember to setup your IPv6 Firewall to drop/allow access on input and forward chains accordingly!) and activate Neighbour Discovery (router advertisement) so your devices will autoconfigure (stateless autoconfiguration) IPv6 addresses. You can still setup fixed IPv6 address on your server.
If you have your server setup with IPv6 address (able to ping google.com 🙂 ) and your web server is running you need to go to Cloudflare, activate your free plan and use their reverse proxy to publish your service. As Cloudflare is and will be accessible via IPv4 and IPv6 (and will do the magic to serve content from your (IPv6 only) server, everyone (also internet users that are using only IPv4 will be able to access your content.
To better understand and actually see it in action I have recorded a short video that filters out only DHCP client / server communication from a Windows (10) workstation and AD (DNS / DHCP) server.
As you can see when machine is started, first it needs to get the IP address that it receives from DHCP server message. When IP is assigned there are more activities going on in DNS context but I have filtered out only Dynamic Updates (by using filter dns.flags==0x2800 and dns.flags==0xa800).
As you can see in the video (as DHCP lease is set only to 1 minute) renewals are happening every 30 seconds (which is correct) – as you probably know (https://www.ietf.org/rfc/rfc2131.txt) when lease is assigned there are two “timers” that are started – renewal (that happens on 50% of lease exhaustion) and rebinding (that happens on 87,5% of lease exhaustion (on 52 second) and after every renewal there is also DNS dynamic update happening towards Active Directory DNS servers.
Basically – Active Directory DNS dynamic updates are by default done from client side without any need for DHCP server to do the update (yes, you can configure that also but by default all the magic is done by domain joined client).
In this last post regarding security that you can apply by using Windows Defender Firewall with Advanced Security I would like to point out another option that is available when you start to configure more complex scenarios by using Connection security rules.
In this example I will force user (in this case Bill) that needs to connect from a specific workstation (PAW) (in this case C2) to use specific application (in this case Firefox) to access the web site on server (in our case SRV2). You will see that connection will not be established if Bill uses Edge (or some other browser).
This example can be an starting point to not only allow the connection to some servers services by using combination of correct user from correct workstation but also application that should be used for such connection.
I just managed to publish Remote Desktop Gateway through Fortigate but not in a way of doing simple port forwarding but in reverse proxy concept so SSL is terminated on Fortigate and then forwarded to Remote Desktop Gateway. The cool thing is that Fortigate can now use Let’s Encrypt also with multiple subject names (also other domain names if you want (as seen in my example)) … I find it simply great that I can leverage certification renewal + extra firewall policies (like Geography) to Fortigate and let Windows Server to work only as Remote Desktop Gateway (on which I do not need to take care of certificates any more…).
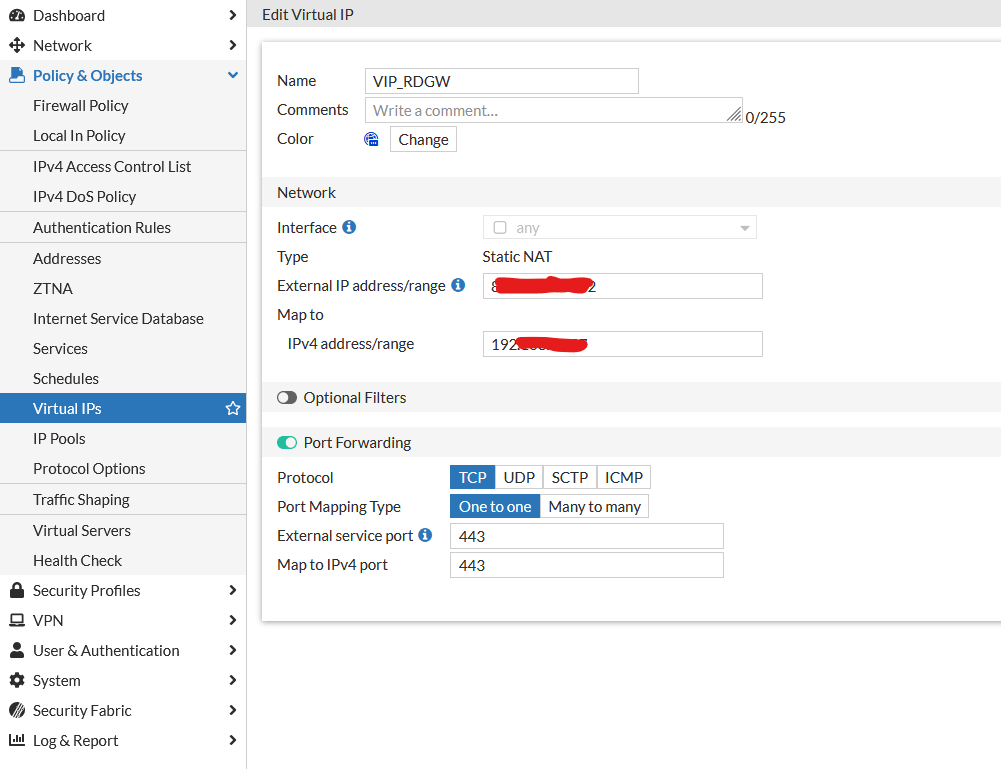
I created a simple Virtual IP where I forwarded port 443 on public IP to 443 on internal IP:
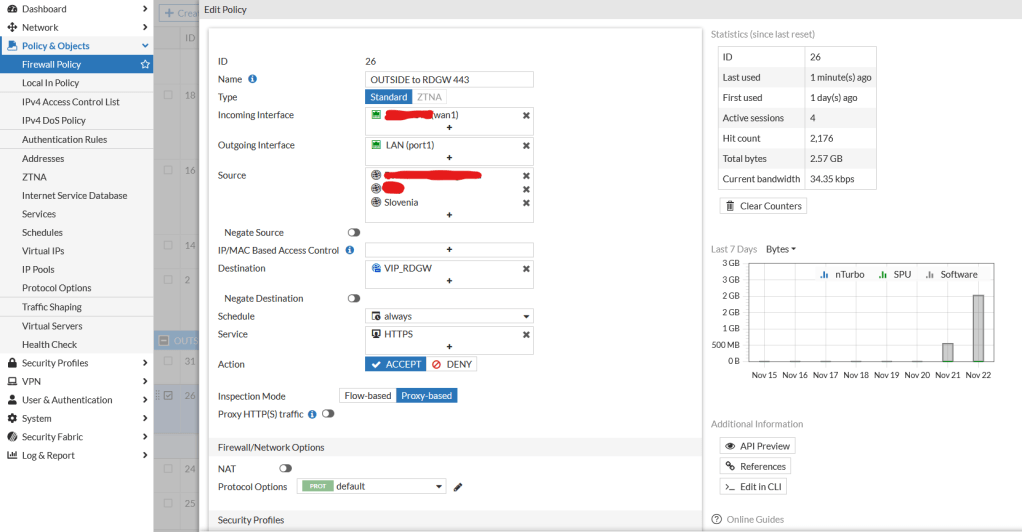
After that I created Firewall Policy rule:
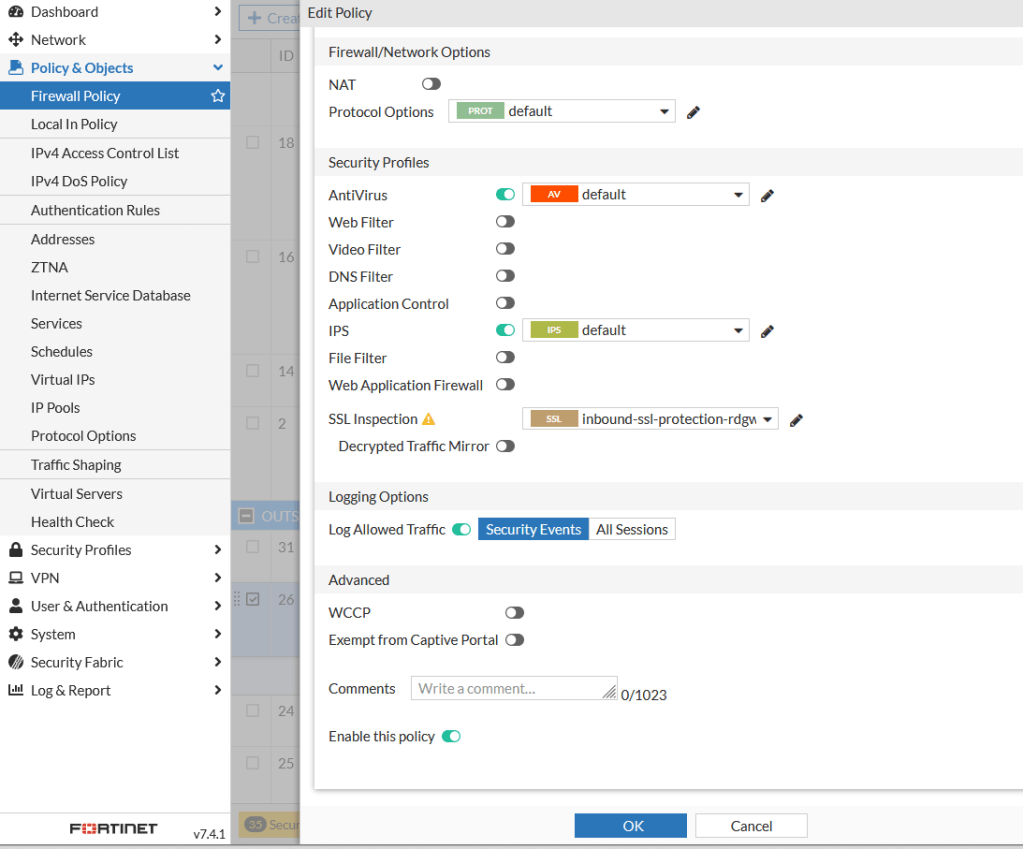
The important part comes here at SSL Inspection:
As you can see I am using two certificates (automatically generated with Let’s Encrypt using Fortigate) with not only multiple subject names on same domain but even different TLD.
There is a (small) trick – you need to enable RCP over HTTP on Fortigate for Remote Desktop Gateway functionality to work – and it is done in command line:
config firewall profile-protocol-options edit 0 set rpc-over-http enable end
After that you are ready to establish Remote Desktop Connection over Remote Desktop Gateway that is published via Fortigate with certificates that are automatically renewed by Fortigate.
That advanced security part in Windows Defender with Advanced Security is the part that covers creation of “special” rules that are similar to Allow rules but only if it is secure and work in conjunction with Connection security rules (that should be configured separately).
Let say that you would like to implement PAW or Jump Box or just limit admins to (even mistakenly) connect to some machines – well Allow the connection if it is secure kind of rules can help you out.
In my example I decided to have two admins: Bill and John they are using same PAW or Jump box called C2 from where they connect to web interface for management of server called SRV2 (it is an empty IIS website – but just to get the idea …).
By following previous tutorials I needed to create firewall rule to allow port 80 to be accessible as local rules are not processed (and we know that in Windows Server, when you install a Role or Feature, firewall rules are automatically created…).
When I do so I am able to access website on http://srv2 from machine C2 if John or Bill are logged in. But what if only Bill is the admin that should access http://srv2 web interface – can we somehow limit that feature for John? The answer is YES!
So first of all we need to create a new Group Policy Object where we will make a Block rule on port 80 – so nobody in the company will be able to access web service on SRV2 any more. After that we will create a new rule where we will chose the option: Allow the connection if it is secure – and as requirement for a successful connection will be that user on the machine should be Bill and machine where Bill is connecting from our PAW or Jump Box called C2. No other combination will fulfill the criteria. So if John is connected to C2 it is a wrong user. If Bill is connected to C1 and would like to do a connection a wrong computer is in use… So only valid combination of valid user and valid computer can fulfill the criteria and allow the connection. Just imagine how granularly you can configure which admin can do or access RDP / Powershell remoting, connect via MMC and other consoles… First of all we reduce potential mistakes that can be done but we are making it also difficult for potential hacker to get all the prerequisites to establish a successful connection … After that we need to create another Group Policy object where we will define Connection security rules – basically we will make PAW or Jump box in our case called C2 establish IPSec connection to SRV2 when user will try to open webpage (on TCP port 80).
In this quick post I would like to emphasize that by using Outbound filtering in Windows Defender Firewall with Advanced Security you can do some kind of “segmentation” without real segmentation that would include implementation of VLANs, moving of your management interfaces IP addresses to different segments, switches configuration, implementation of access lists / firewall rules between segments that we all know that takes a lot of time and effort.
Yes, you should do it but in the meantime while you are preparing for such project implement outbound firewall rules on your clients‘ and by doing so prevent lateral movement of potential hacker from infected / compromised machine to other machines in the neighborhood …
But even more importantly – prevent your clients’ machines to access devices / interfaces / protocols that they do not ever need. For example – do your end users need to access switches management interfaces? Or servers out-of-band management cards? Or your UPS management interfaces? Or your servers (excluding RDP servers) on port tcp 3389? And finally (as this will be covered in the video) do your end users ever use Powershell to access network resources or download stuff from the internet by using cmdlet: Invoke-WebRequest (or something similar)? Probably (hopefully) the answer is NO. And Windows Defender Firewall with Advanced Security and its possibility to apply outbound rules to your clients will help you achieve such state in your network.
In this short video I am showing outbound firewall rules that prevent (only) Powershell (32/64 bit, ISE, not ISE and also the one accessed remotely via Powershell Remoting) to access the internet. Powershell is a great tool that is often (as it is directly integrated in operating system) abused by people that do not have good intentions 🙂 So by misleading the users to click on something that triggers Powershell (as legit tool in Windows) and runs some scripts Powershell is able to download some extra malware from the internet. By using this firewall rules at least we do not need to worry that malware will be delivered by some Powershell script. 🙂 By following this example you can create your outbound firewall rules that can increase security of your endpoints.
In most environments where I work I see poorly or not implemented at all Windows Defender Firewall with Advanced Security, even if since Windows Server 2008 and Windows Vista (well in fact a lot of things were there also before but not so intuitively configurable …) it provides great features that can drastically increase security in the network environments …
First of all it provides inbound and outbound filtering – with outbound rules you can do a lot to prevent your users accessing other devices inside your networks …
At least in Slovenia (yes, we are quite a small country where good old Small Business Server was widely adopted) there are still many companies that do not have real segmentation in place (with vlans for printers, users workstations, servers, network management, access lists between segments…) – and we all know that implementing it when you have everything in-place is quite an effort and a project that can take a lot of time…
Well while you are preparing for this step you can do a lot by using outbound rules on Windows Defender Firewall with Advanced Security and simply disallow your end users to access management interfaces of your network devices, you can prevent users to establish connection to servers on protocol that they do not need and so on …
For now we were talking just about basic inbound / outbound rules but what is that Advanced Security part in it’s name? Well we will cover that in next parts dedicated to this great piece of software that you all already have included in your operating system.
Today I would like to just quickly go through basic implementation that I will call Firewall baseline for client computers where I will just deploy a Group Policy object where I will configure Windows Firewall to be turned on and to ignore local rules – this is very important when you are deploying Windows Firewall – by doing so after Group Policy is applied all local rules will be ignored (also those that could be potentially created afterwards by user who has local admin rights) – only and exclusively rules that you define through Group Policy will be effective on your workstations. This is important to be sure that you are completely in control of what is going on on your workstations (and of course servers) firewall.
In the video you can see that at the beginning I am remotely connected to a client PC (that will get firewall settings later through Group Policy) and after Group Policy is applied RDP sessions in disconnected (as local rules are not effective any more (Apply local firewall rules: No) – and only after I add manual exemplary rule for RDP (tcp port 3389) RDP session* is reconnected.
*Yes, this rule is without any extra parameters and making such rule is not a good idea – as it opens RDP from anywhere to the workstation affected by this policy – it was created just for demo purposes for this video.
A while ago I was searching for the option to observe activity of potential hackers accessing a vulnerable server (with simple admin password) to see what kind of tools and tactics they are going to use … As server was exposed to the internet via RDP protocol (tcp 3389) I needed an option to view inside RDP session and if possible without being seen by those who would get into the server.
So using VNC or something like that was not an option as it is not possible (or is at least difficult and probably not so incognito as needed in this case) to monitor RDP session (but only “console” session).
After a bit of research I found out that the option that I have seen many times in Windows Defender Firewall with Advanced Security called Remote desktop – Shadow (TCP-in) can be used in such cases … I never explored what this feature means or how it works until I was searching for a solution for my observation mission. 🙂
After a bit of DuckDuckGoing I found out that there is an excellent blog post regarding this feature, written by colleague Arris Huijgen who explains this option into detail – so I invite you to take a look at his blog post Spying on users using Remote Desktop Shadowing – Living off the Land. Well I have created a quick video to show you how it works so you can get better idea and decide – or to absolutely prohibit it in your environment (but hey, you can do it if you know it exists, right? 🙂 ) or use it and understand the potential risks it may bring…
Another underused and overlooked tool or concept in Windows operating systems when we are talking about having more insights about what is going on in our environment is Event Viewer and its’ option to do Event Forwarding to a central server where you can analyze events and trigger further actions/activities (trigger a script that sends e-mail, or send this event to some other SIEM system …)
So I decided to record a video that will show you how simple it is in fact to deploy so called Source initiated (preferred method) event forwarding to a central event collector (in my case called SRV1).
So …
First I am connecting to my SRV1 (future event collector) where I turn on Event Viewer and I move to Subscriptions where I need to accept that Windows Event Collector Service will be started… Then I create a test subscription and I configure it as Source computer initiated subscription (so my client PCs (and/or servers) will send event logs to SRV1 (collector). I configure the group by using built-in group domain computers so it will potentially make it possible to receive logs from all computers in Active Directory (as you can see in the settings you can distribute certificates and do it also with Workgroup machines).
Then I configure which events I want my PCs to send to Collector and how “old” this events can be (I have configured only events that happened last hour…). I decided to receive only Event IDs: 4720-4728 (more on this events you can read here) and custom Event ID: 5555. I configured subscription settings to be optimized for minimal latency.
After that I fired up Powershell to check WinRM connectivity by using cmdlet Test-WSMan and I did it locally and towards one of client machines – in my case: C1 where I received an error (becouse WinRM service is not running, is not configured and Firewall is not enabled). As Powershell window was already opened I checked the channelAccess value by typing the command: wevtutil gl security – this information will be needed later for SRV1 to have access to events in Security log. So I copied the string: O:BAG:SYD:(A;;0xf0005;;;SY)(A;;0x5;;;BA)(A;;0x1;;;S-1-5-32-573) and I added (A;;0x1;;;NS) at the end so whole string is now: O:BAG:SYD:(A;;0xf0005;;;SY)(A;;0x5;;;BA)(A;;0x1;;;S-1-5-32-573)(A;;0x1;;;NS) Hey, what are this strange strings? You can read more about it on Microsof official documentation here.
After that I moved to my DC and to Group Policy Management. On my clients OU (where my PCs are located) I have created new GPO called WinRM where I will configure WinRM prerequisites. I also added firewall rules that are needed for WinRM to work.
Afterwards I have created new GPO called Forward Events where I have configured two parameters:
Configure Target Subscription Manager – the URL of our collector:
At the end there is Refresh parameter that forces client to check for new potential subscriptions (and refresh of the old ones (for example when you add additional Event Ids that you want to be sent on collector)).
On the parameter: Configure log access for Security log I have added the string (from before): O:BAG:SYD:(A;;0xf0005;;;SY)(A;;0x5;;;BA)(A;;0x1;;;S-1-5-32-573)(A;;0x1;;;NS)
At 4:45 I did a little mistake in the video – the subscription will not work as I forgot to configure startup behavior of WinRM service on our client machines so I needed to fix that by using Group Policy Preferences where I have configured WinRM to run at startup and change state to running. At 6:25 you can see that first source was connected to my subscription.
On Collector server I have fired two commands: wecutil enum-subscription and afterwards: wecutil ss Test subscription 1 /cf:Events This are needed for events to have detail text exposed on collector server.
Afterwards I have moved to C1 (client machine) machine where I have created new local user (Event ID 4720). In couple of seconds we can see events being shipped to our collector server SRV1 in Forwarded Events log in its Event Viewer.
Next I joined C2 machine to a domain to show that event forwarding settings are immediately applied to the machine and C2 is also sending logs (on this machine I also tried to make my own event (5555) and trigger it by using Powershell cmdlet.