And finally it is here! An update for Windows Server 2025 that we were waiting for and it is allowing us to create so called Campus Cluster. You can read more about it at the official Microsoft statement, here.
My demo setup looks like this – we have site called Ljubljana there are two racks Rack 1 and Rack 2 and in each rack we have two nodes (in Rack 1 we have N1 and N2 and in Rack 2 we have N3 and N4).
These four servers are domain joined (we have an extra VM called DC with Windows Server 2025 and Active Directory installed), they are connected to “LAN” network of the site with subnet 10.10.10.0/24 and each node has additional two network cards, one connected to a network that I call Storage network 1 with subnet 10.11.1.0/24 and Storage network 2 with subnet 10.11.2.0/24. Storage networks should be RDMA enabled (10, 25, 40, 100 Gbps) low latency, high bandwidth networks – don’t forget to enable Jumbo frames on them (if possible (it should be :))).
It looks like this:

To be able to setup hyper-converged infrastructure (HCI) with Storage Spaces Direct you need Failover Cluster feature and Hyper-V role installed on server. I am doing it via Powershell:
(This cmdlet will require reboot as Hyper-V is installed…)
Enable-WindowsOptionalFeature -Online -FeatureName Microsoft-Hyper-V -All
Install-WindowsFeature -Name Hyper-V -IncludeManagementTools
Install-WindowsFeature Failover-Clustering -IncludeManagementTools
When prerequisites are meet I will run cmdlet to form a cluster C1 with nodes N1-N4, with static IP address in the “LAN” segment and no storage (as I do not have any at this moment:
New-Cluster -Name C1 -Node n1, n2, n3, n4 -StaticAddress 10.10.10.10 -NoStorage
Before enabling Storage Spaces Direct you need to define Site, Racks and Nodes in those Racks. I have formed a typical site Ljubljana (Slovenian capital city) in that site I have created two racks in virtually two datacenters: DC1 and DC2 and I put those racks in site Ljubljana, then I added nodes in racks.
You can do it by using Powershell cmdlets:
New-ClusterFaultDomain -Name Ljubljana -FaultDomainType Site
New-ClusterFaultDomain -Name DC1 -FaultDomainType Rack
New-ClusterFaultDomain -Name DC2 -FaultDomainType Rack
Set-ClusterFaultDomain -Name DC1 -FaultDomain Ljubljana
Set-ClusterFaultDomain -Name DC2 -FaultDomain Ljubljana
Set-ClusterFaultDomain -Name N1 -FaultDomain DC1
Set-ClusterFaultDomain -Name N2 -FaultDomain DC1
Set-ClusterFaultDomain -Name N3 -FaultDomain DC2
Set-ClusterFaultDomain -Name N4 -FaultDomain DC2
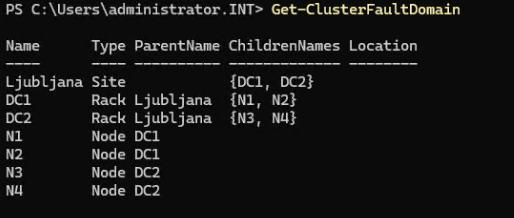
At the end you should have something like this if you go with Powershell cmdlet: Get-ClusterFaultDomain
When this is done you can proceed with enabling Storage Spaces Direct where you will be first asked if you want to perform this action (like every time when you enabled it until now) but coupe of seconds later you will be prompted again as now, system understood that we have site and racks and nodes in different racks.
Prompt will inform you that: Set rack fault tolerance on S2D pool. This is normally racommended on setups with multiple racks continue with Y (Yes).
In couple of seconds you can already observe newly created Cluster Pool 1 that will consist of all disks from all nodes (in my case 32 disks as every node has 8 disks dedicated for Storage Spaces Direct).
As by official documentation you should perform update storage pool by using Powershell cmdlet:
Get-StoragePool S2D* | Update-StoragePool
You will be prompted with information that StoragePool will be upgraded to latest version and that this is irreversible action – proceed with Y (Yes).
Check that the version is now 29 by using:
(Get-CimInstance -Namespace root/microsoft/windows/storage -ClassName MSFT_StoragePool -Filter ‘IsPrimordial = false’).CimInstanceProperties[‘Version’].Value
Now you can proceed with forming disks – 4 copy mirror (for most important VMs) or 2 copy mirror (for less important workloads).
I modified a bit official examples for fixed and thin provisioned 2 way or 4 way mirror disks and I used this oneliners:
New-Volume -FriendlyName “FourCopyVolumeFixed” -StoragePoolFriendlyName S2D* -FileSystem CSVFS_ReFS –Size 20GB -ResiliencySettingName Mirror -PhysicalDiskRedundancy 3 -ProvisioningType Fixed -NumberOfDataCopies 4
New-Volume -FriendlyName “FourCopyVolumeThin” -StoragePoolFriendlyName S2D* -FileSystem CSVFS_ReFS –Size 20GB -ResiliencySettingName Mirror -PhysicalDiskRedundancy 3 –ProvisioningType Thin -NumberOfDataCopies 4
New-Volume -FriendlyName “TwoCopyVolumeFixed” -StoragePoolFriendlyName S2D* -FileSystem CSVFS_ReFS –Size 20GB -ResiliencySettingName Mirror -PhysicalDiskRedundancy 1 -ProvisioningType Fixed
New-Volume -FriendlyName “TwoCopyVolumeThin” -StoragePoolFriendlyName S2D* -FileSystem CSVFS_ReFS –Size 20GB -ResiliencySettingName Mirror -PhysicalDiskRedundancy 1 -ProvisioningType Thin
In next episode I will put some workloads on this nodes and simulate failures to see how Campus Cluster handles them.
More information also from my colleagues MVPs:
https://splitbrain.com/windows-server-campus-clusters/
